
Apothecary Diaries Inspired Hairpin

date published
Feb 11, 2026
tools used
project type
Personal
There's a girl who I used to really admire. She likes this character named Maomao from an anime called The Apothecary Diaries. For her birthday, I thought it would be fun to make a hairpin for her, because I am bad with words.
Making this hairpin was an absolute joy. One of the trickiest things I've ever done with a lot of planning (and money..)
Things started off with just an idea- I already knew I wanted to make a hairpin. However, I wasn’t sure how to do any of this at all, or if it was even possible for me to do it myself.
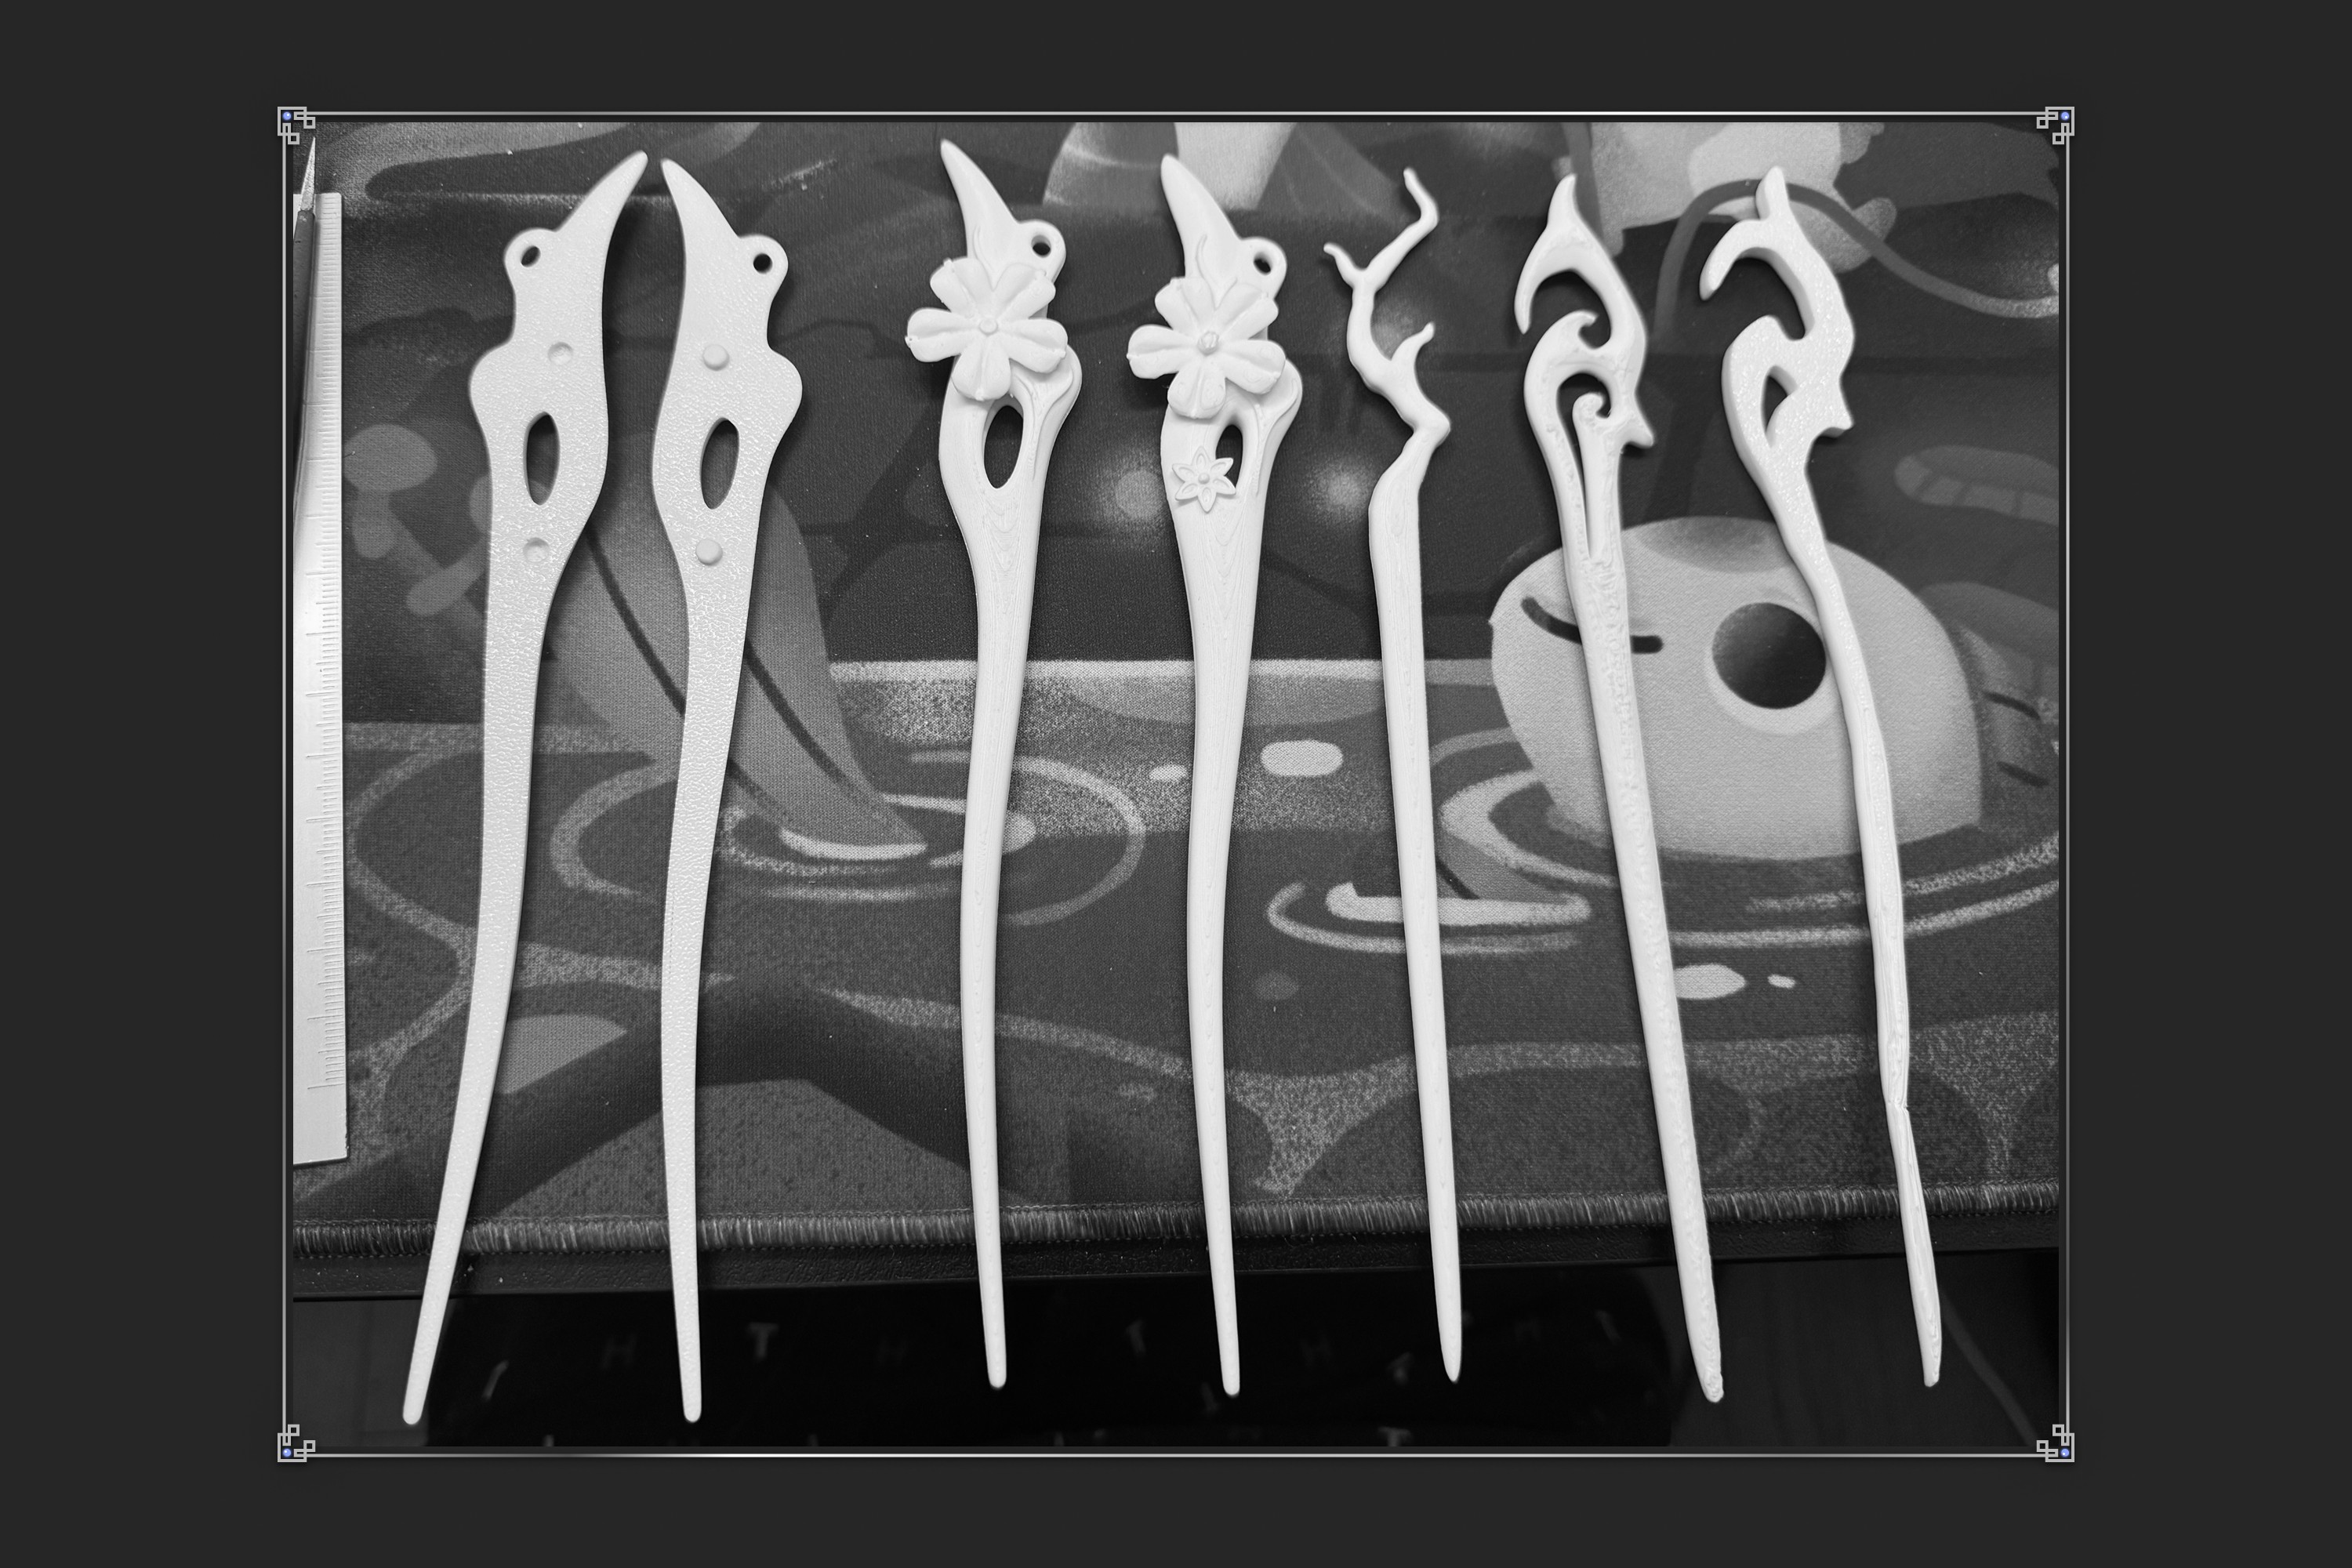
Drawing sketches was the first step, alongside locating good references. The original idea was just to recreate the male lead's (Jinshi's) hairpin 1:1, but I had seen it done already on Etsy and to me it felt less meaningful if I had just copied it. So I looked more for unique designs that I liked and created some concepts.
keeping in mind the average length of a hairpin, I tried to find references to match the ratio of design at the top, to length at the bottom.

Pinterest board collection of some initial ideas
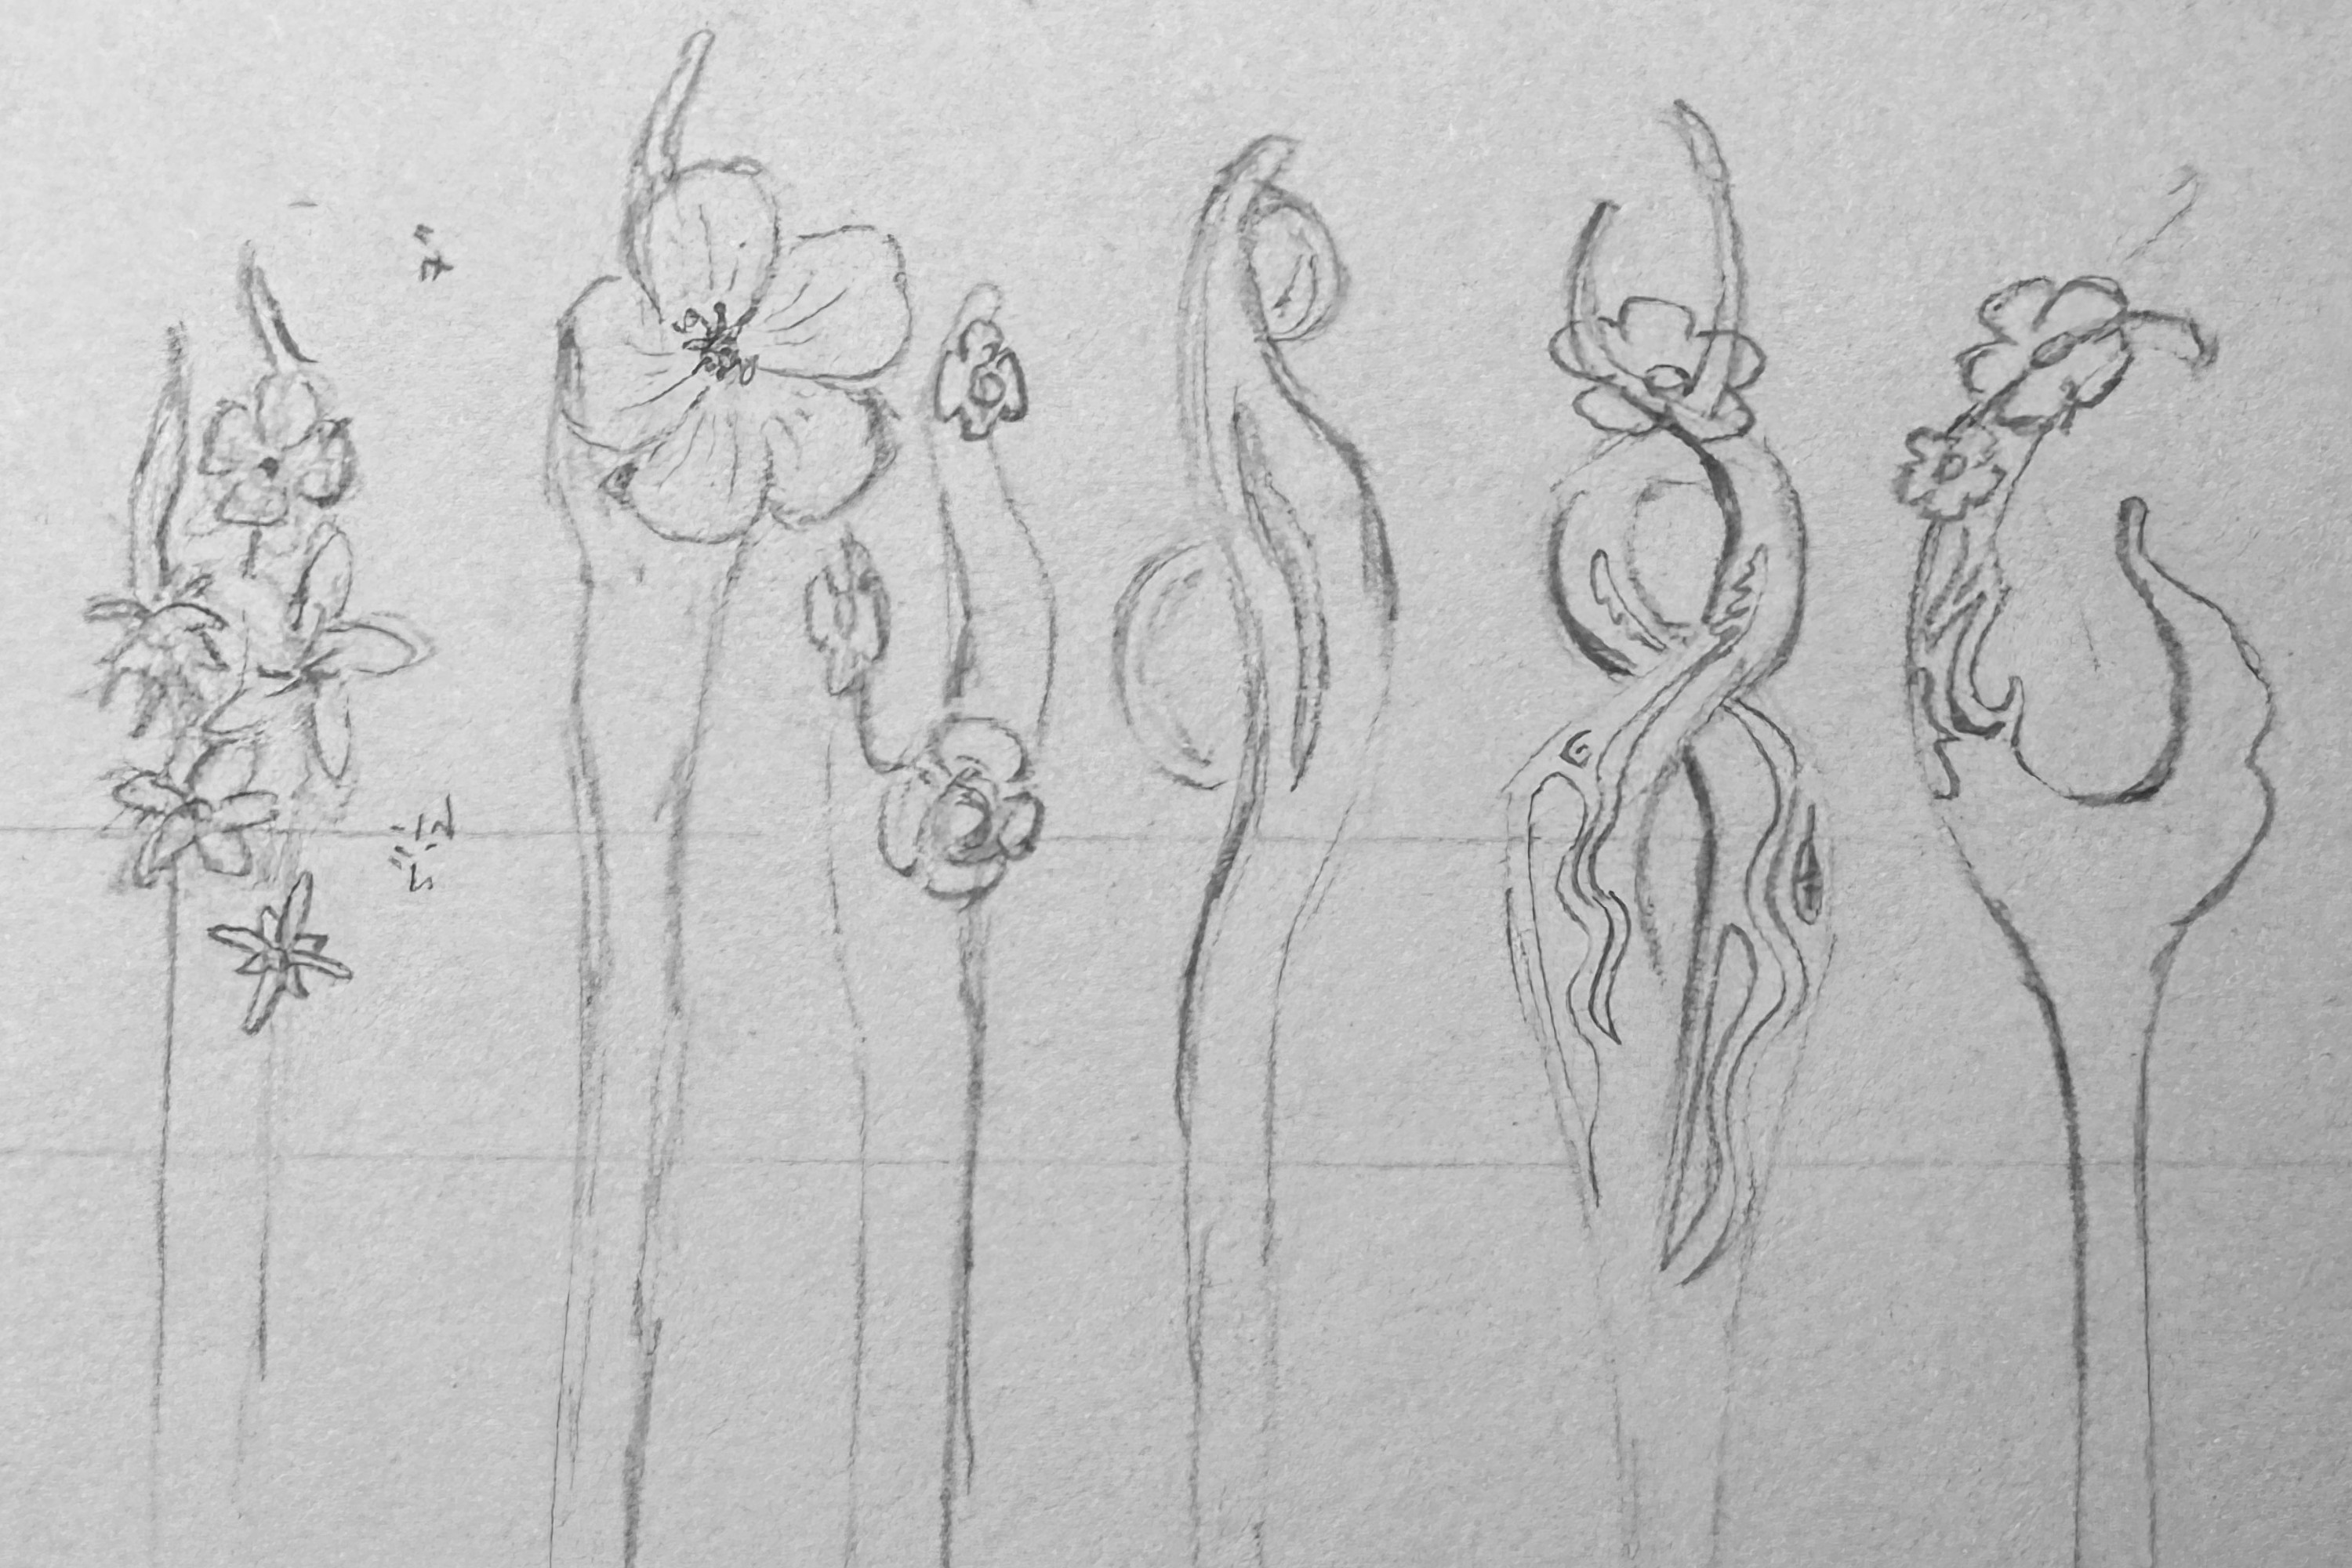
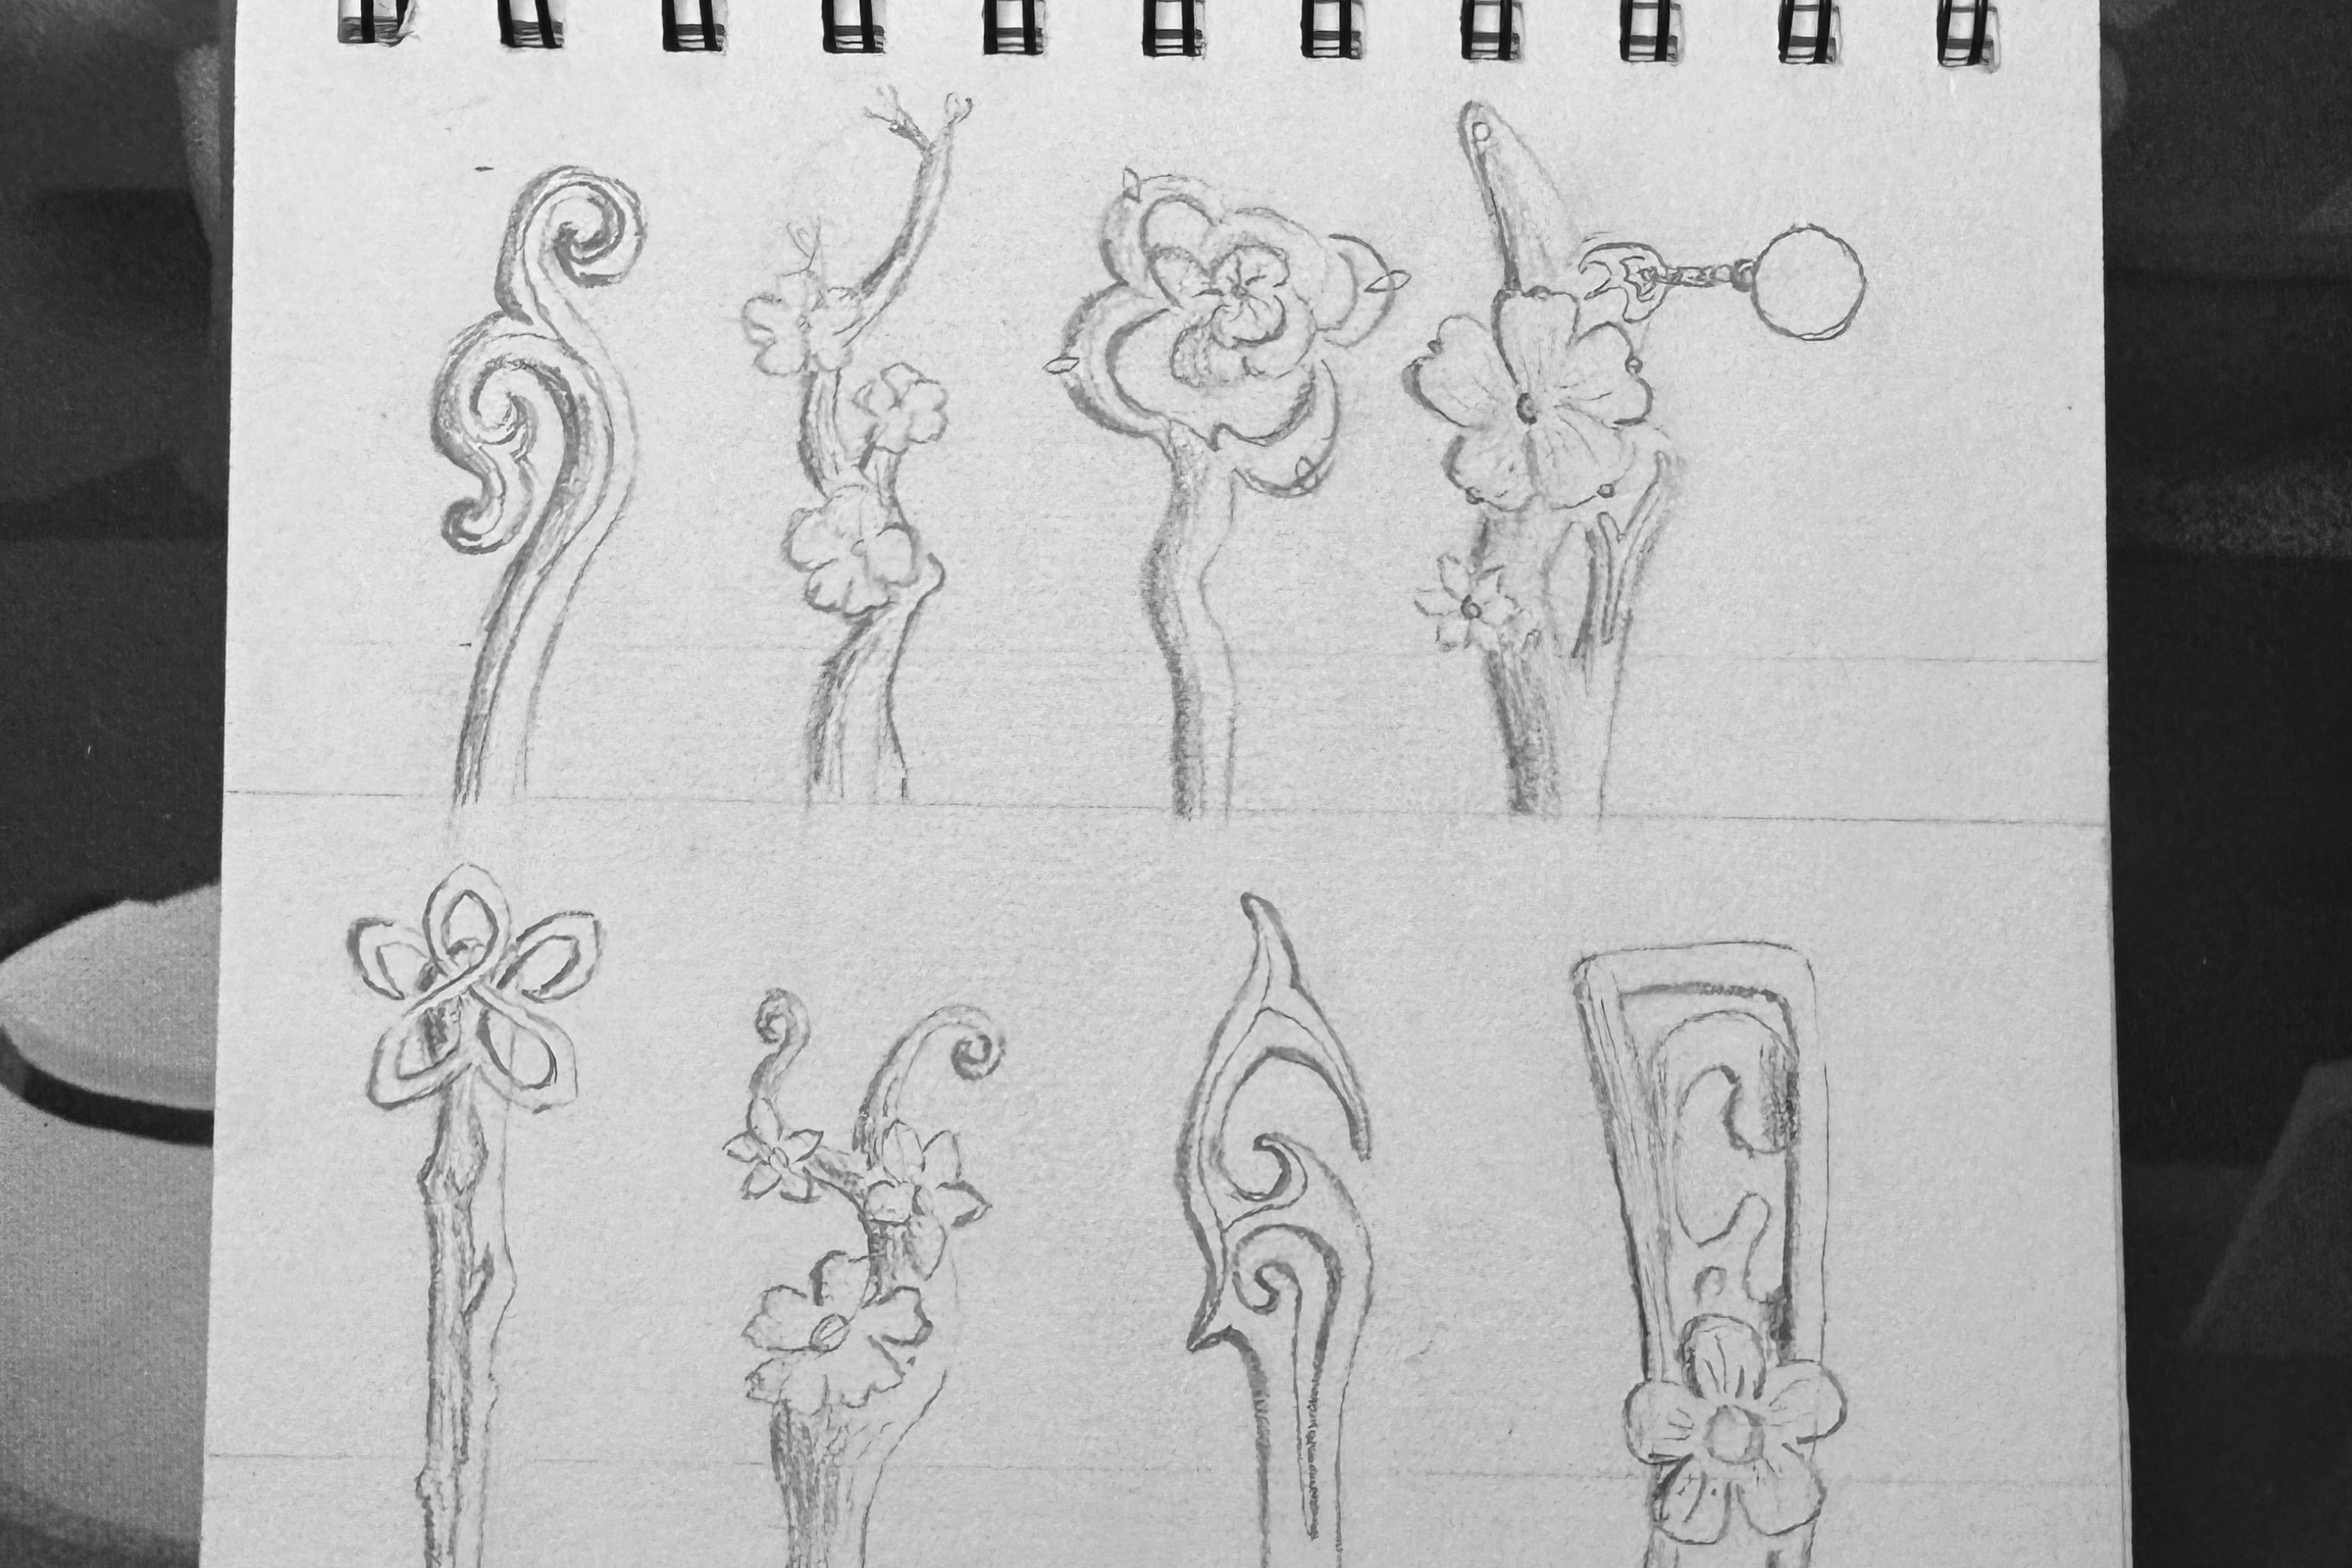
The second set looks better than the first, and I tried to shade them slightly to show where depth would be.
At this point, I had to look into how this was actually going to happen, and make sure my designs could actually be made. here’s what I wanted:
a pretty and meaningful design - it was important that it captured her personality well.
premium and high quality build
some decoration that adds character
All these wants would be hard challenges to solve..
Wood would've been a better option in terms of design, but it seemed harder to get perfect. So I opted for metal.
I’ll tackle one thing at a time: Forming the main metal structure of the hairpin. Here, there had to be a delicate balance between feasibility, cost, and quality. To make something out of metal, there are many techniques and many metals you could choose. The skin tone of the wearer was more pale, and so I chose to opt for cooler tones and so gold and warmer colored metals like copper or brass was disregarded. The first option was silver- silver jewelry is the usual go to, and I originally thought that that would be the best option. It doesn’t tarnish easily, and can be polished to be nice and shiny. There’s also stainless steel jewelry but the process of creating that is hard for various reasons- not something I can easily do at home at the quality that I am expecting.
I also found a few processes to create silver rings and smaller jewelry. These included: Sandcasting and investment casting (Lost Wax casting) which then branches off into Lost PLA casting, etc.
Investment casting is the overall superior option for creating any type of design- it can capture super high detail and the actual pattern can be any shape you want. However, the equipment needed to get it working well would be way too much and seemed like a hassle to acquire. (Vacuum , thermacast filament, plaster of Paris, etc etc. also you need a kiln to burn out the pattern so… that was way too much and not feasible. it added steps that at the time I thought would be a lot harder.
So I settled for sand casting, which also had its own challenges. The hardest was figuring out exactly what I would need and why. There was no exact tutorial on how to create a hairpin, and I really wanted the end result to be as good as I could possibly do it, so I studied many videos and articles on what I would need. I dove into jewelry making, traditional sandcasting, 3D printing and cosplaying, to find a way to combine it all together. Let’s go through how it worked!
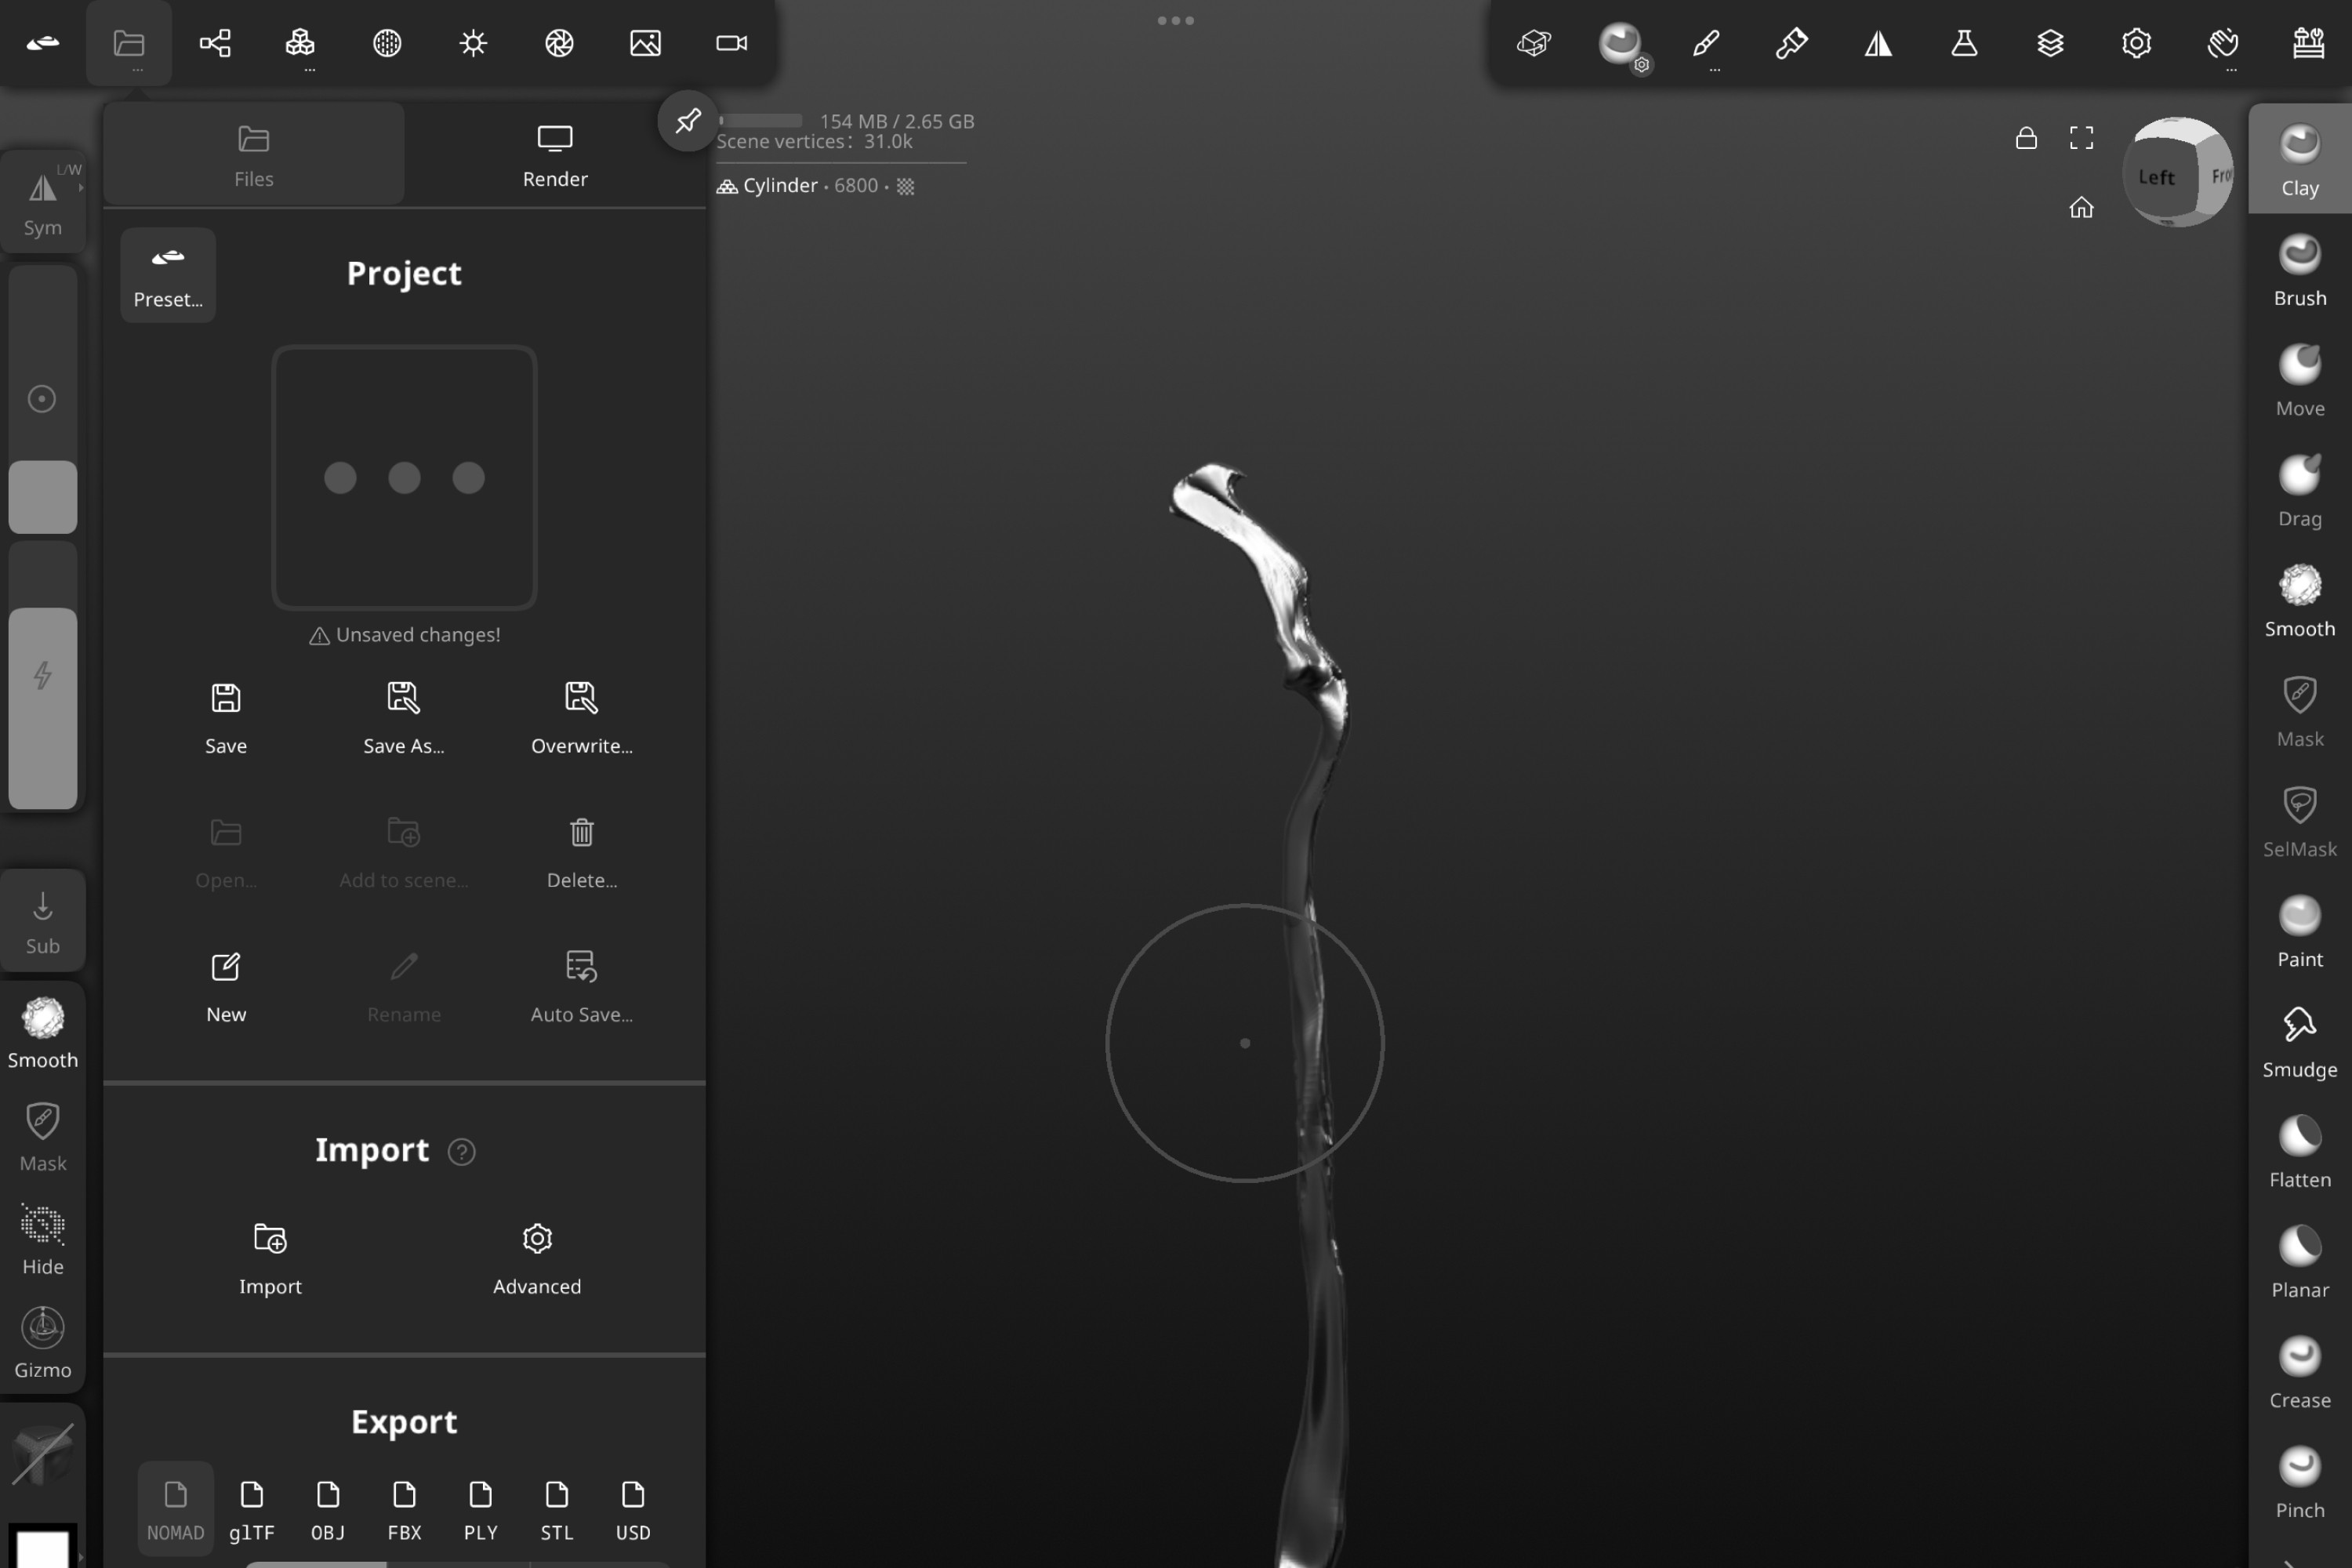
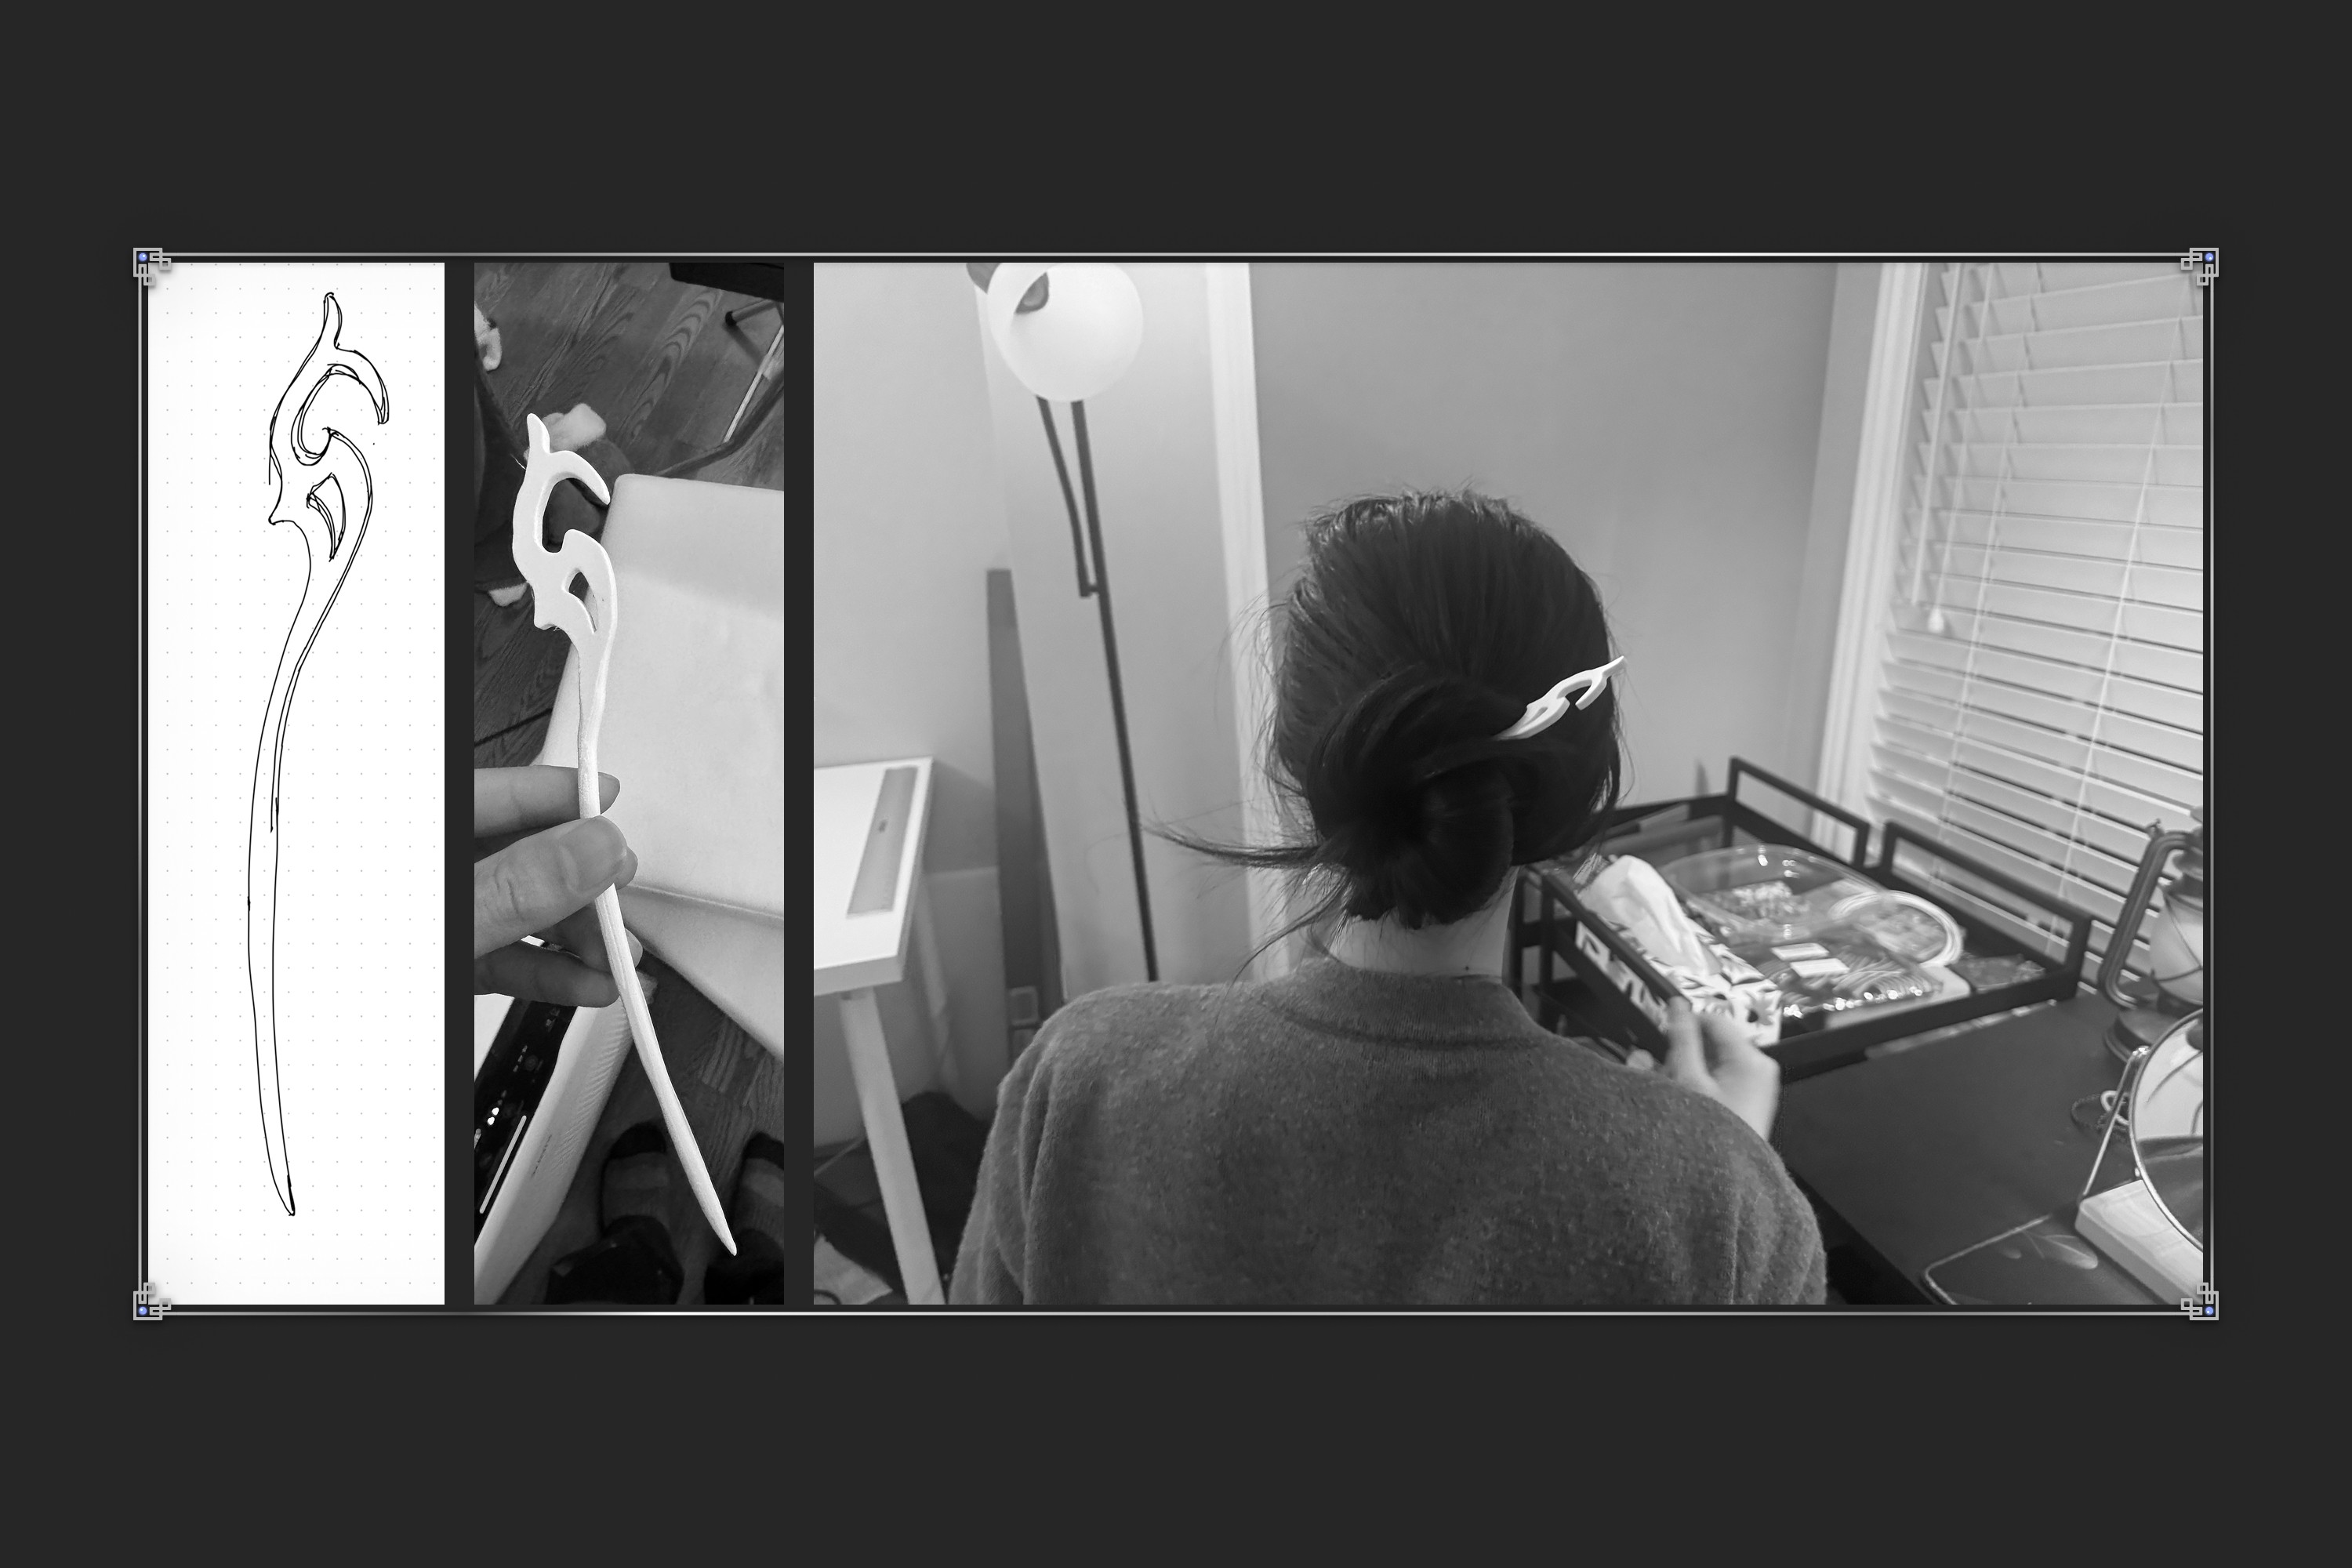
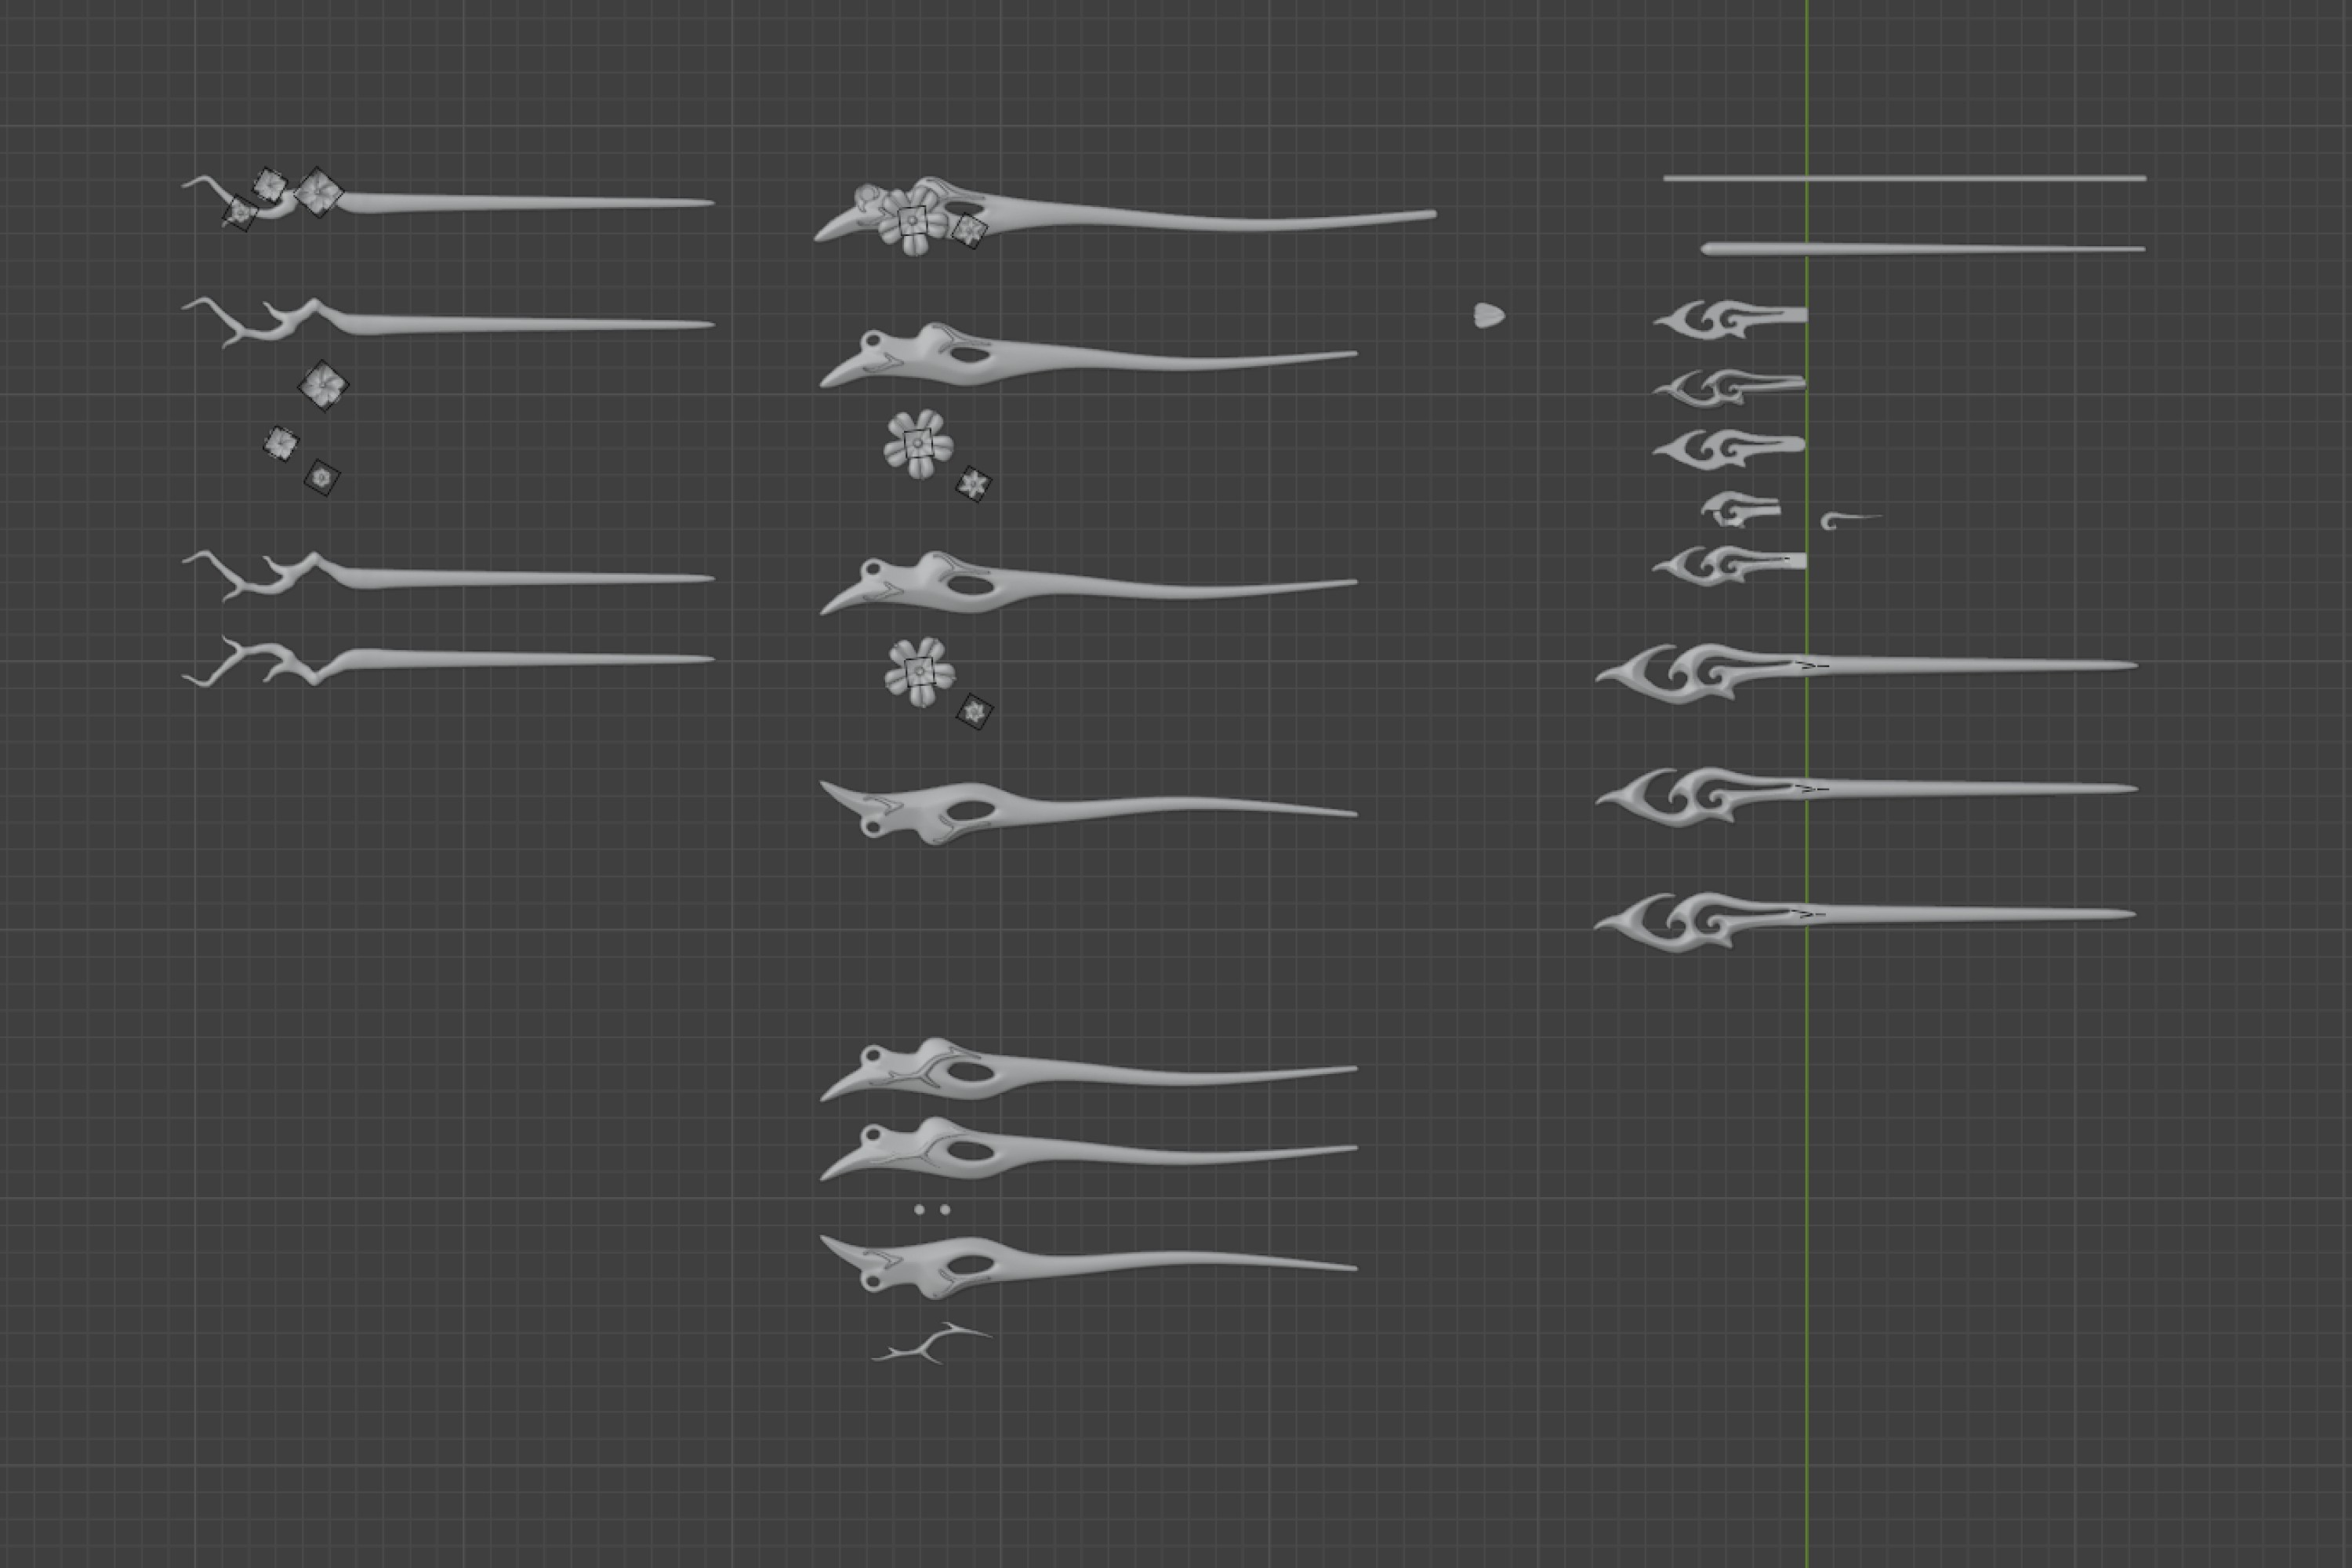
I wanted to create a prototype with the simplest design I could do to ensure I could get the curves right. I wasn’t confident with my 3D skills so this was an attempt at sculpting it using Nomad Sculpt, then sending it directly to my 3D printer, the bambu lab A1 mini. It ended up not working so well, but it gave me a good idea on what could be improved and what could be kept.
Notes on sculpting:
Thickness throughout the hairpin was uneven
Sculpting results in inaccuracies and inconsistencies in the mesh, which were visible in the end result
Tip is too sharp
Length is okay but need to consider the persons hair length
The overall shape of the pin should be less arched to fit well and not fall out of hair
I'm sure if an actual good sculptor did this it would be better, but at my skill level, it was too difficult. I took this reflection and went for a round 2 and brought it to blender to try create a better mesh.
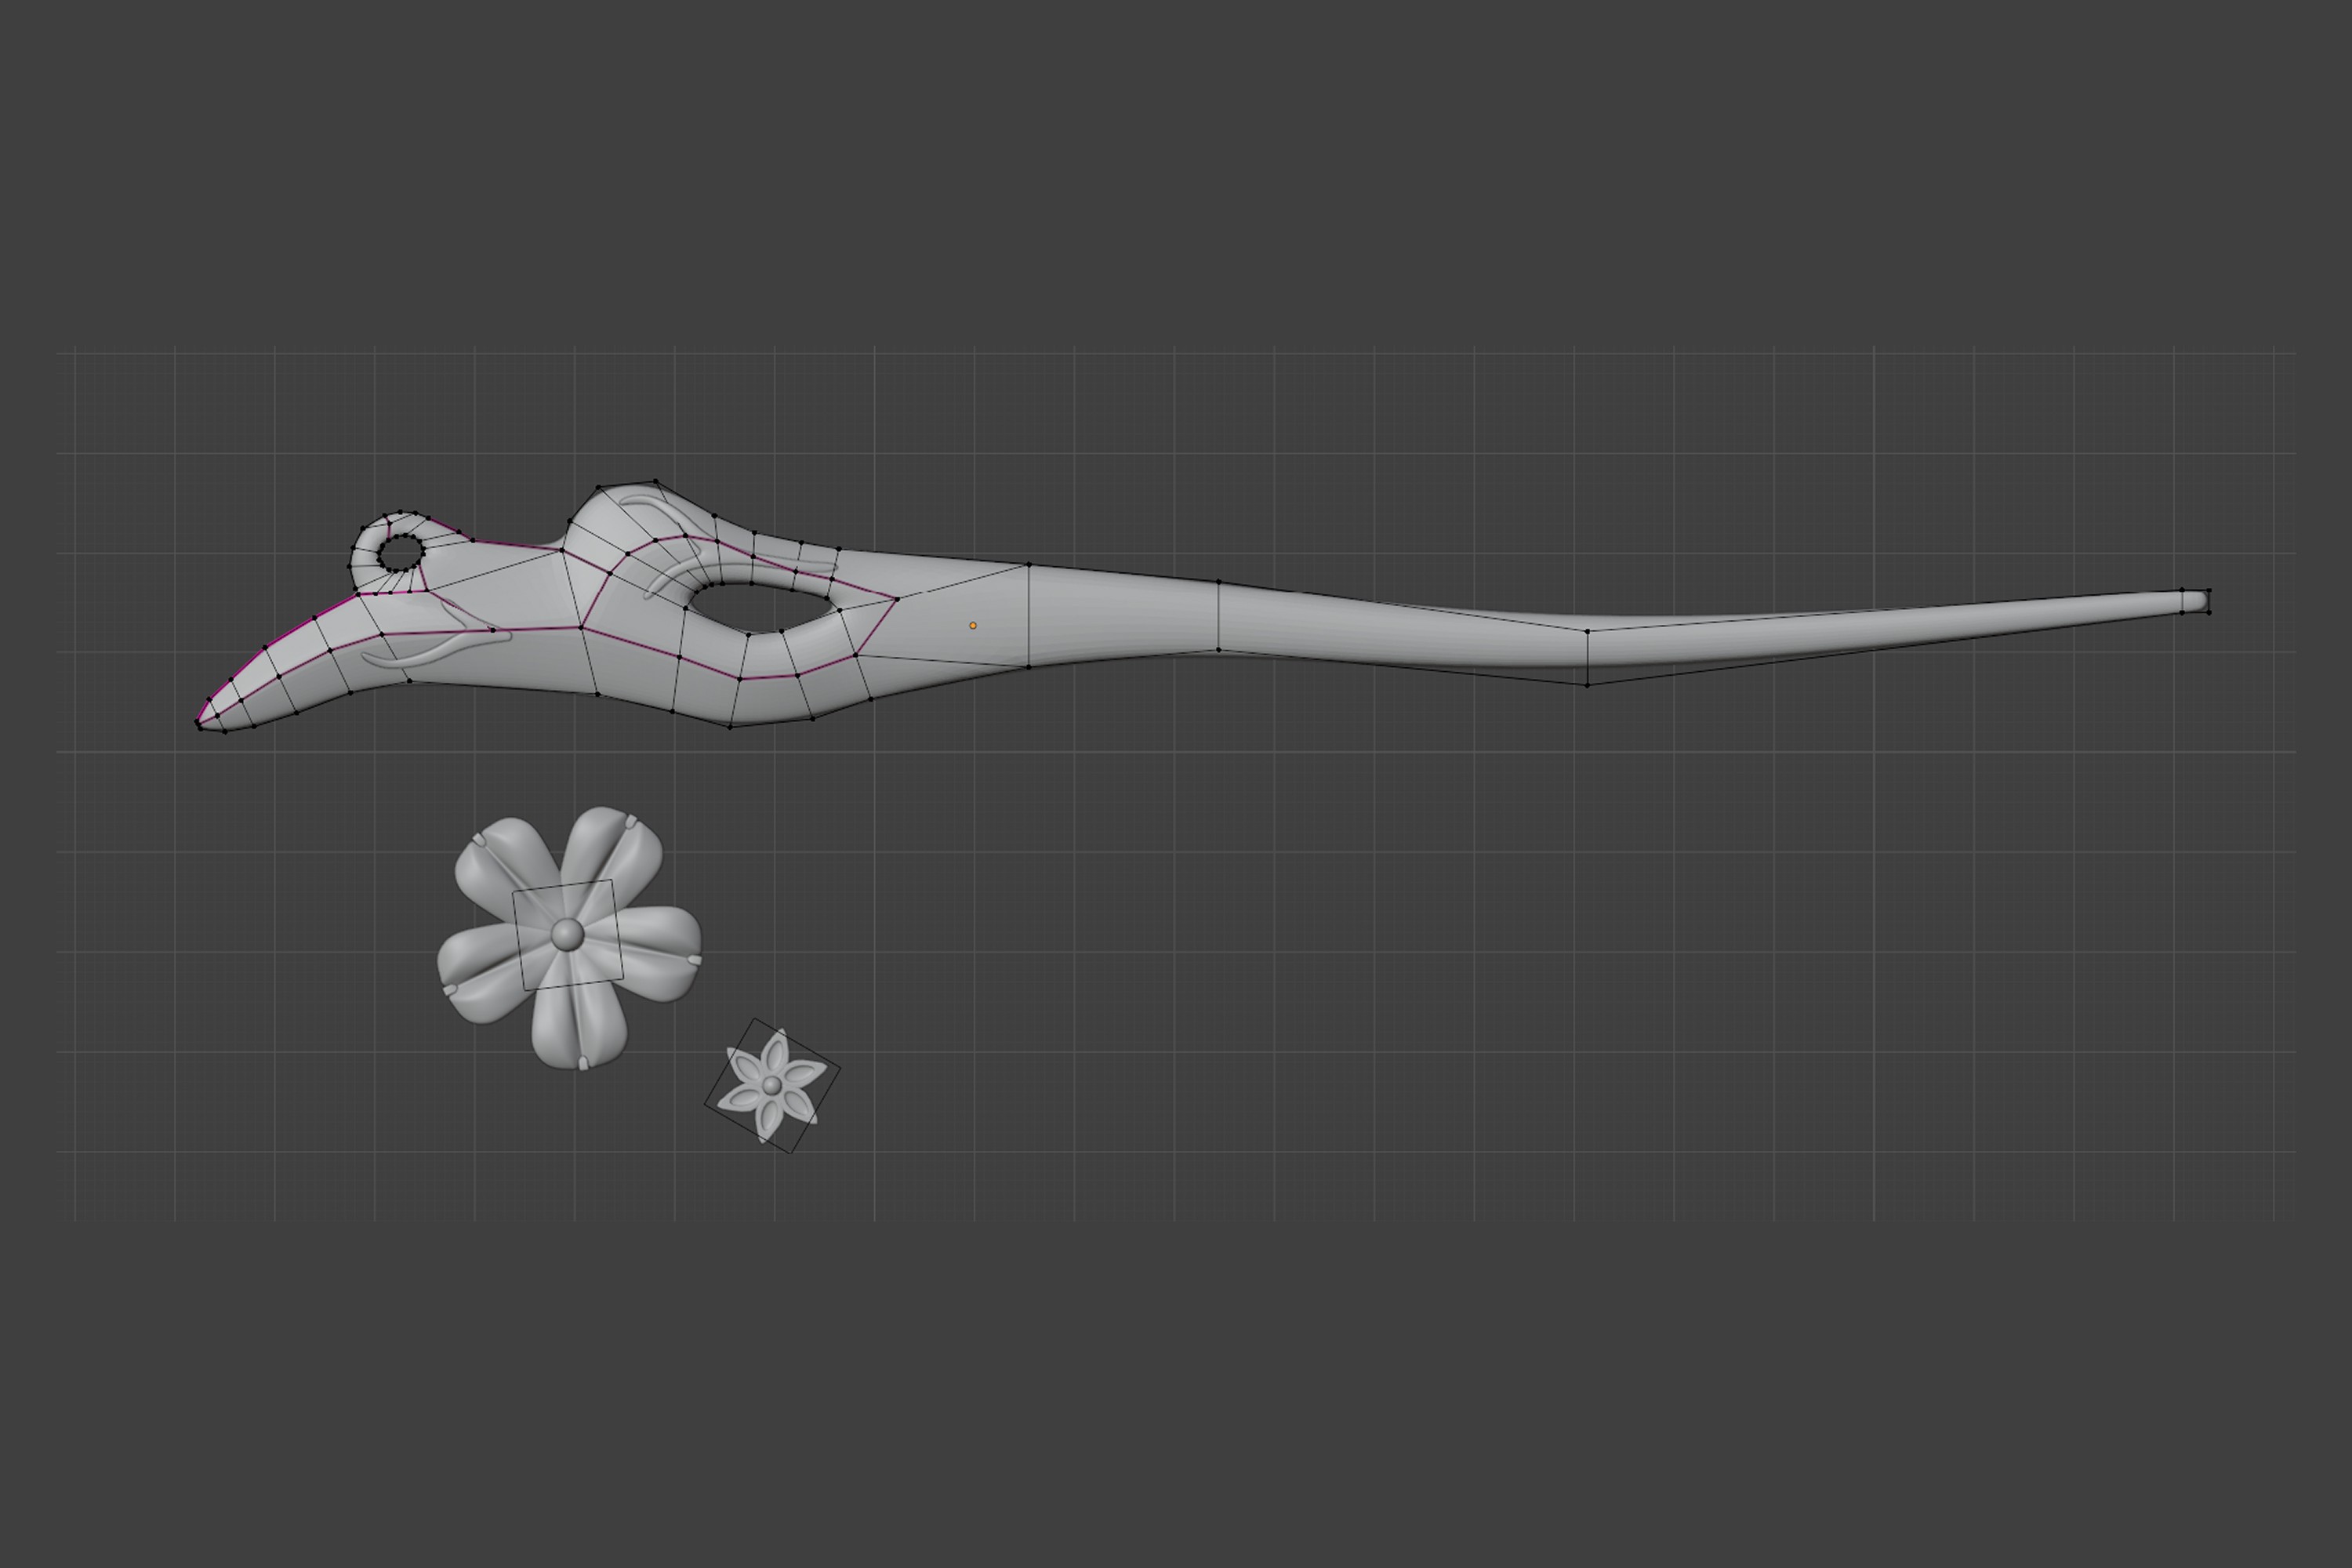
to do this, I looked into tutorials on how to make swords and found some smarter ways to draw the mesh. I placed a reference image on a plane, and simply extended cubes until I could fill the entire sketch with rectangle slices. Then it was as easy as applying subdivision and marking edge creases to make some parts sharper than others. Oh not to mention splitting the hairpin in half and using the mirror modifier to make the thickness of both sides the same! Snapping vertices to the mirrored plane, using proportional editing, all that made it quite nice and fun to make.
Also- this is not in order but setting up the right units and measuring out how this would fit on my 200 x 200mm print bed was a challenge. It was at this point that I used a plugin on blender to measure the volume of material I was using and then converted it to how many Troy ounces of silver I would need that I realized that it would be $300 in material costs if I were to use .925 Sterling silver … anyways here’s how it looked! Getting better, but not exactly the right vibe.
After a few more tests, I wanted to improve my processes and move on to the main design that I was aiming for, now that I knew it was doable!! I watched some tutorials on how to make flowers 🌺 and printed out the next iteration

I learned here that 3D printing a pattern is a fast way of iterating- but has some downsides.
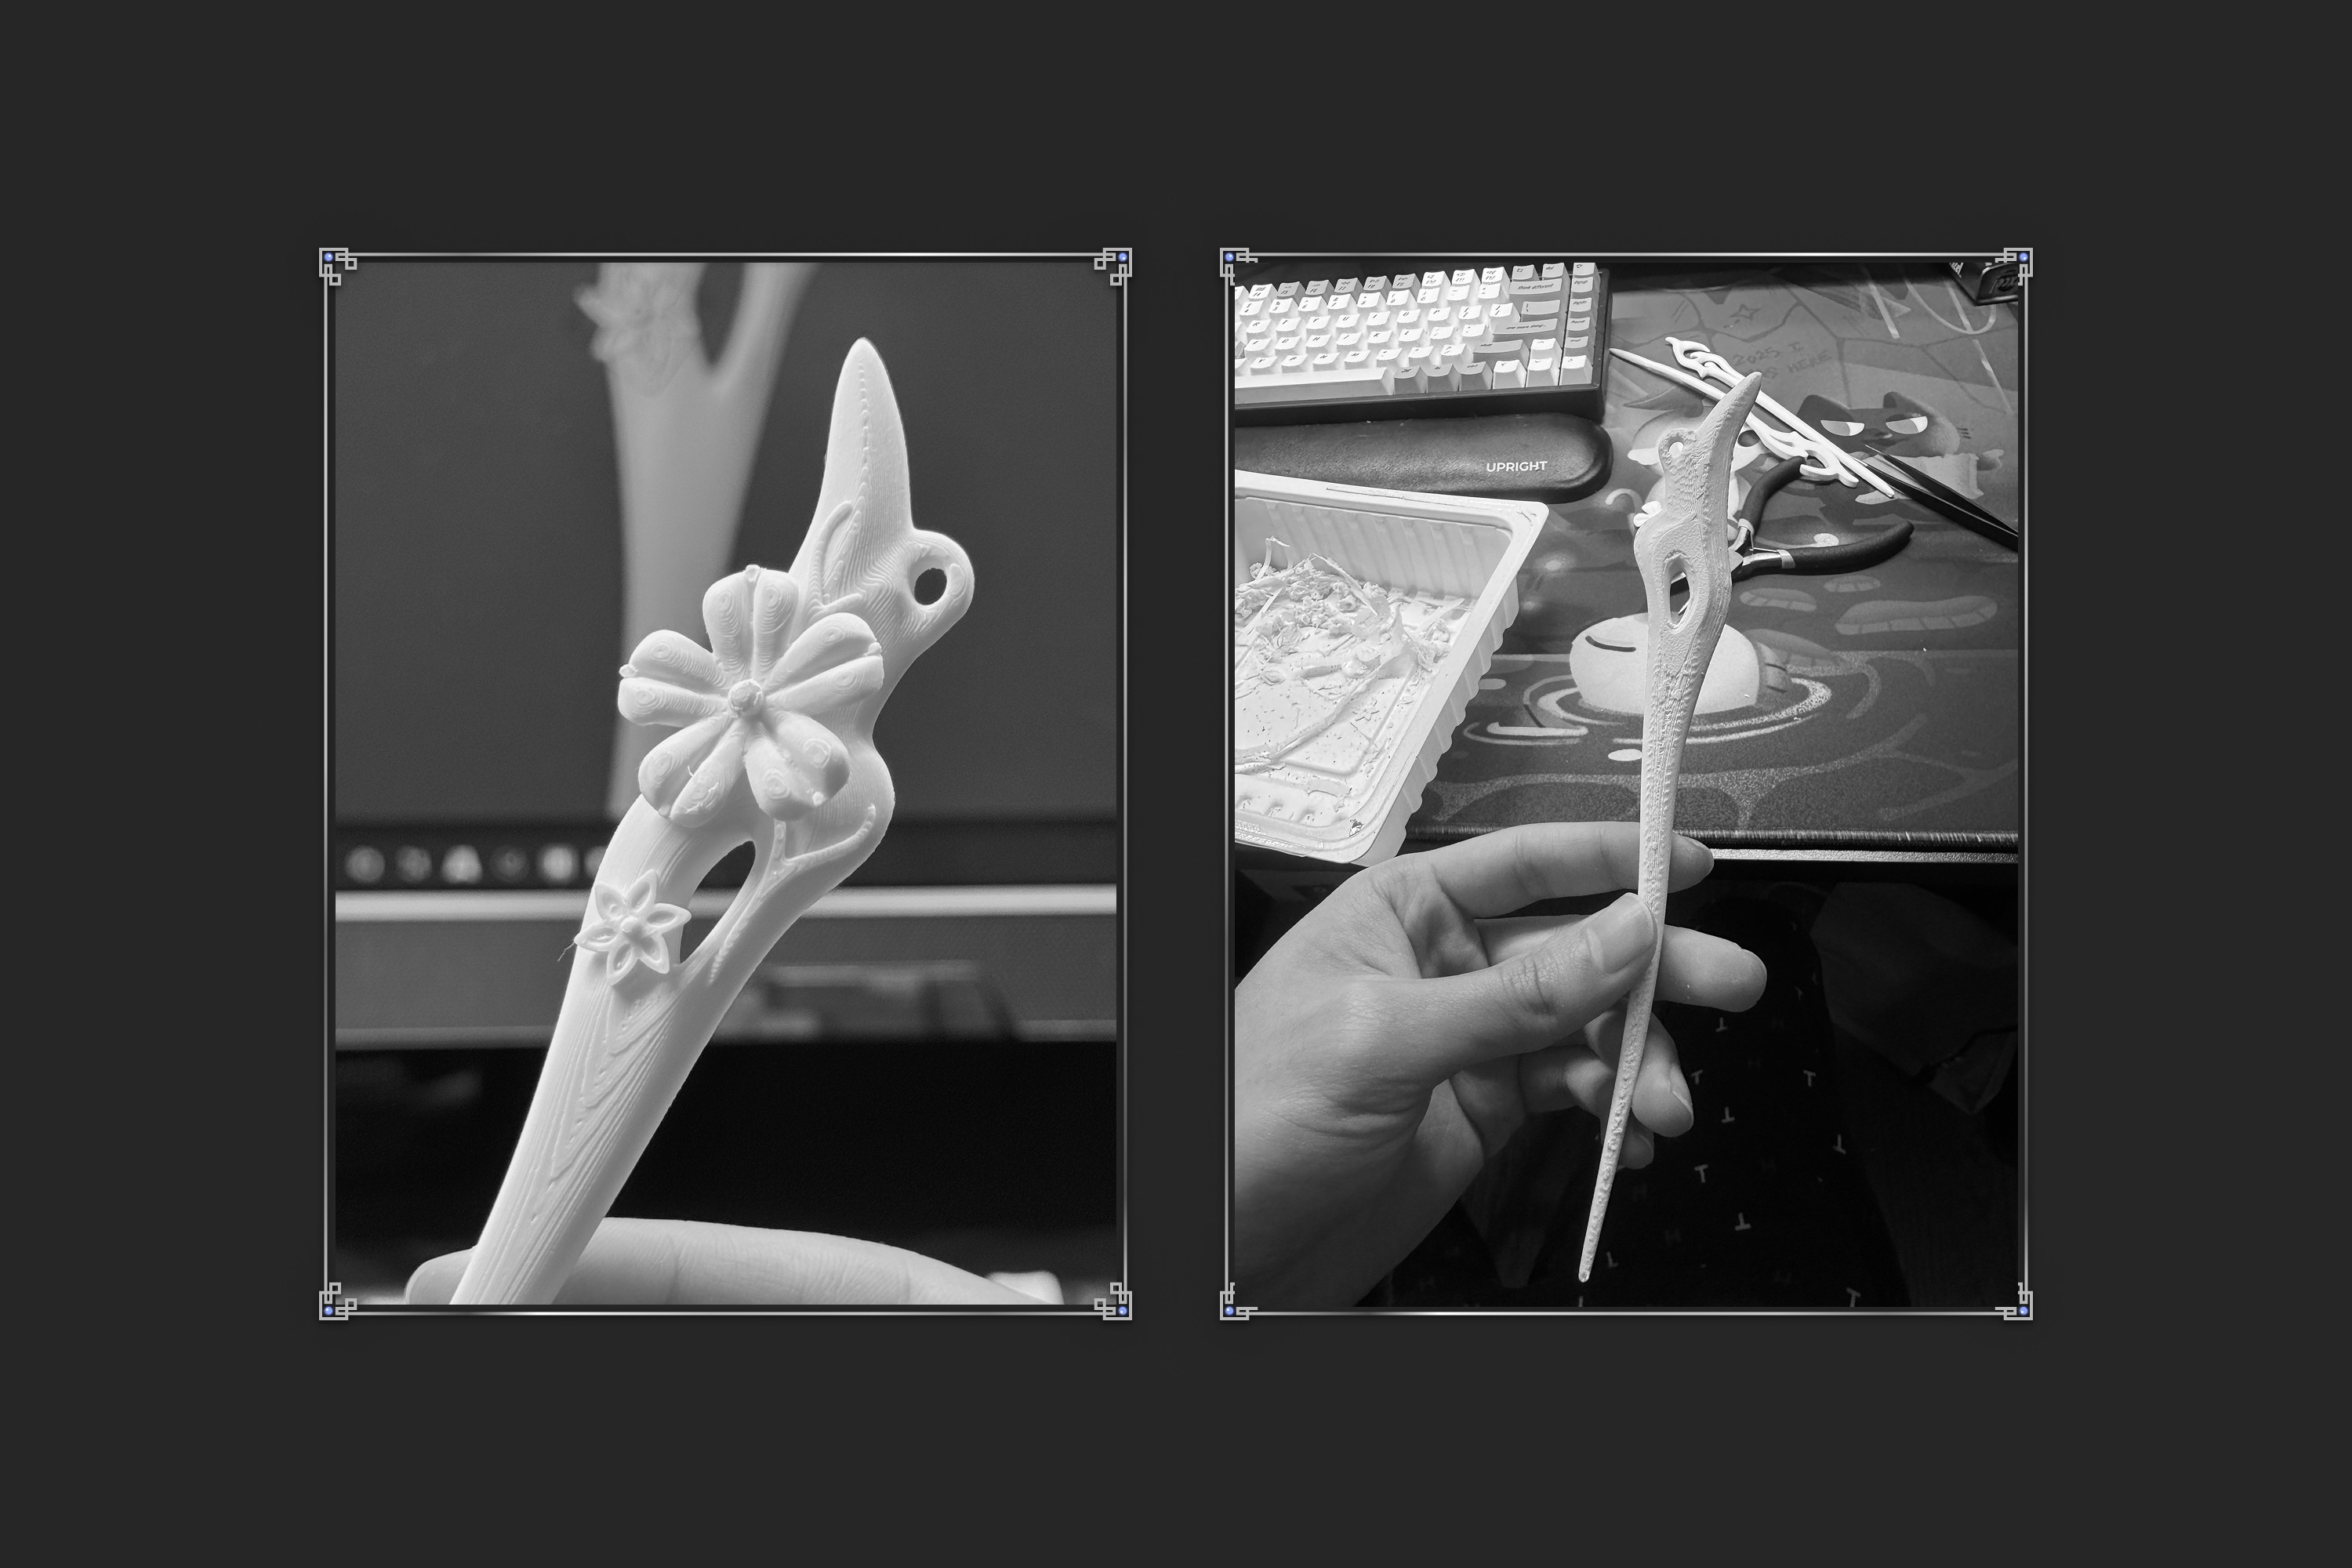
Since both sides are not flat, supports are required and causes surface imperfections on the side facing the baseplate (image on the right)
Curved surfaces are especially not curved- layer lines are extremely visible even after having the nozzle print diameter to be as small as possible.
Details might work as a 3D print but could be too thin or small to actually work for sandcasting.
This was especially the case for the custom flowers, as the geometry was not very clean and each petal was oddly shaped and thin.
This would also now introduce the issue of soldering metal together. If I make the flowers out of silver, I would have to use silver solder to connect them.. meaning that I would need a heating appliance specifically hot enough to melt at least extra-easy solder (typically using MAPP gas or butane torch) . I also need something to hold all of the things together while I’m working on it so I’d need a stand of some sorts. This was all too much effort and equipment required.
I decided to buy a few mother of pearl flowers from Etsy- and they turned out soooo pretty. Much better than trying to make it 100% from scratch.
These issues led me to look more into how people cleaned up 3D prints in the cosplay space. They showed how using things like bondo filler putty / UV resin could fill in layer lines from prints. This would be very helpful but I only did half the step because my spray can of filler primer didn’t work. I sanded down the print to get rid of most of the lines using 180 grit and then 320 grit sandpaper, which worked okay, but a more thorough job with the primer would've been better. It is easier to sand away sand than it is metal.
To solve the surface imperfection issue, I cut my 3D model into two halves to print them facing up so that it would be flat prints from the baseplate, so I would no longer need supports. I printed dowels for the print to fit together with some slight tolerances and chamfering I learned to do from school! This step was also necessary to fit the pattern properly in the sandcasting process later on.
A bunch of iterations in blender. I tried a few things, but the middle column design was the final decision.
Sandcasting requires a few things which seem simple but really are not.
metal (silver)
furnace/ torch to heat the metal
mold forming material (petrobond sand, green sand etc)
a flask to hold the mold
designs that fit the medium
Silver was too expensive- in hindsight it would've been worth it, for durability and maintainability purposes. I opted for this alloy called ZA12 (Zamak 12). It’s a zinc based alloy- and I know, alloys are typically not a good idea for jewelry! I thought it would be fine though, since the chemical composition of ZA12 I was buying didn’t contain chromium or lead (no zinc rot), and no nickel or copper, so it wouldn't cause skin irritation / green skin. I also looked into if those metals could cause issues for hair, since that was the primary use case, and there seemed to be no issues there either. I had seen some people make Zamak pieces online, not for jewelry but for swords and other larger things, and thought that it looked great. Shiny, a nice silver-like surface finish with a density even higher than aluminum with a 430 deg C liquidus point(melting completion temperature). Since it’s primarily zinc, it would also allow me to play with patina effects later on if I wanted to. It’s what people use for stained glass art to make the frames black. Or to add depth and that more grungy look to silver jewelry (silver patina)
This was also hard because it was still winter at this time and I didn’t want to use a butane torch in my house. Nor would my mom let me. So I opted for an electric furnace that could go up to 1100 degrees C, much more than I needed to melt ZA12. It’s more expensive, but came with two graphite crucibles that I could re use a few times in the future. It was way better than guessing if my metal was at the right temp, because I could just set the temp to be 430 degrees and let it cook for 25 mins or so.
The sand I used is an oil based sand called petrobond. It’s I think 400 mesh sand so very fine and will let me capture the details I need, and reduce the amount of sanding I would need to do after. I underestimated how much i would need though, and so I had to buy more after. This was another factor for why I opted for sandcasting, since most of the sand is reusable for the next project after casting. Not like investment casting where you can’t really reuse the plaster you use to create the mold. Financially this made sense for if I wanted to make more things later on.
The flask was one of the hardest parts to get right. I would’ve bought one of those small round aluminum ones or a taller 7 inch steel one but unfortunately a hairpin is too long to fit within any easily purchasable flask. So of course I had to build my own. Lol
I forgot to mention this earlier but the 3D model/ pattern needs to have something called a draft angle- essentially things need to be able to slide out of the mold when you flip things over, like building a sandcastle. So that’s another limitation of the sand casting method
Time for home depot!
There’s many ways to build a flask, and many materials you can use too. For a good flask, you need a few things:
Enough distance from the edges of the flask to the pattern (~1-2 inches)
Complete flatness between the two halves to prevent flashing (where metal can spill out the middle parting line of the flask)
Some way of aligning the top and bottom halves of the mold every time
Enough space/ depth to fit a basin and sprue (where you pour the metal in)
I had to look into how to build flasks- there were so many guides on what to do that it was honestly very overwhelming. I ended up moving away from the jewelry making space and started using techniques from traditional sandcasting, because their flasks were larger and explanations for why things worked seemed more scientific. Not to discredit the jewelry making hobbyists but there was a lot of conflicting advice and so I didn’t trust it as much. I found videos that showed good flask building techniques and tried to copy them as best I could.
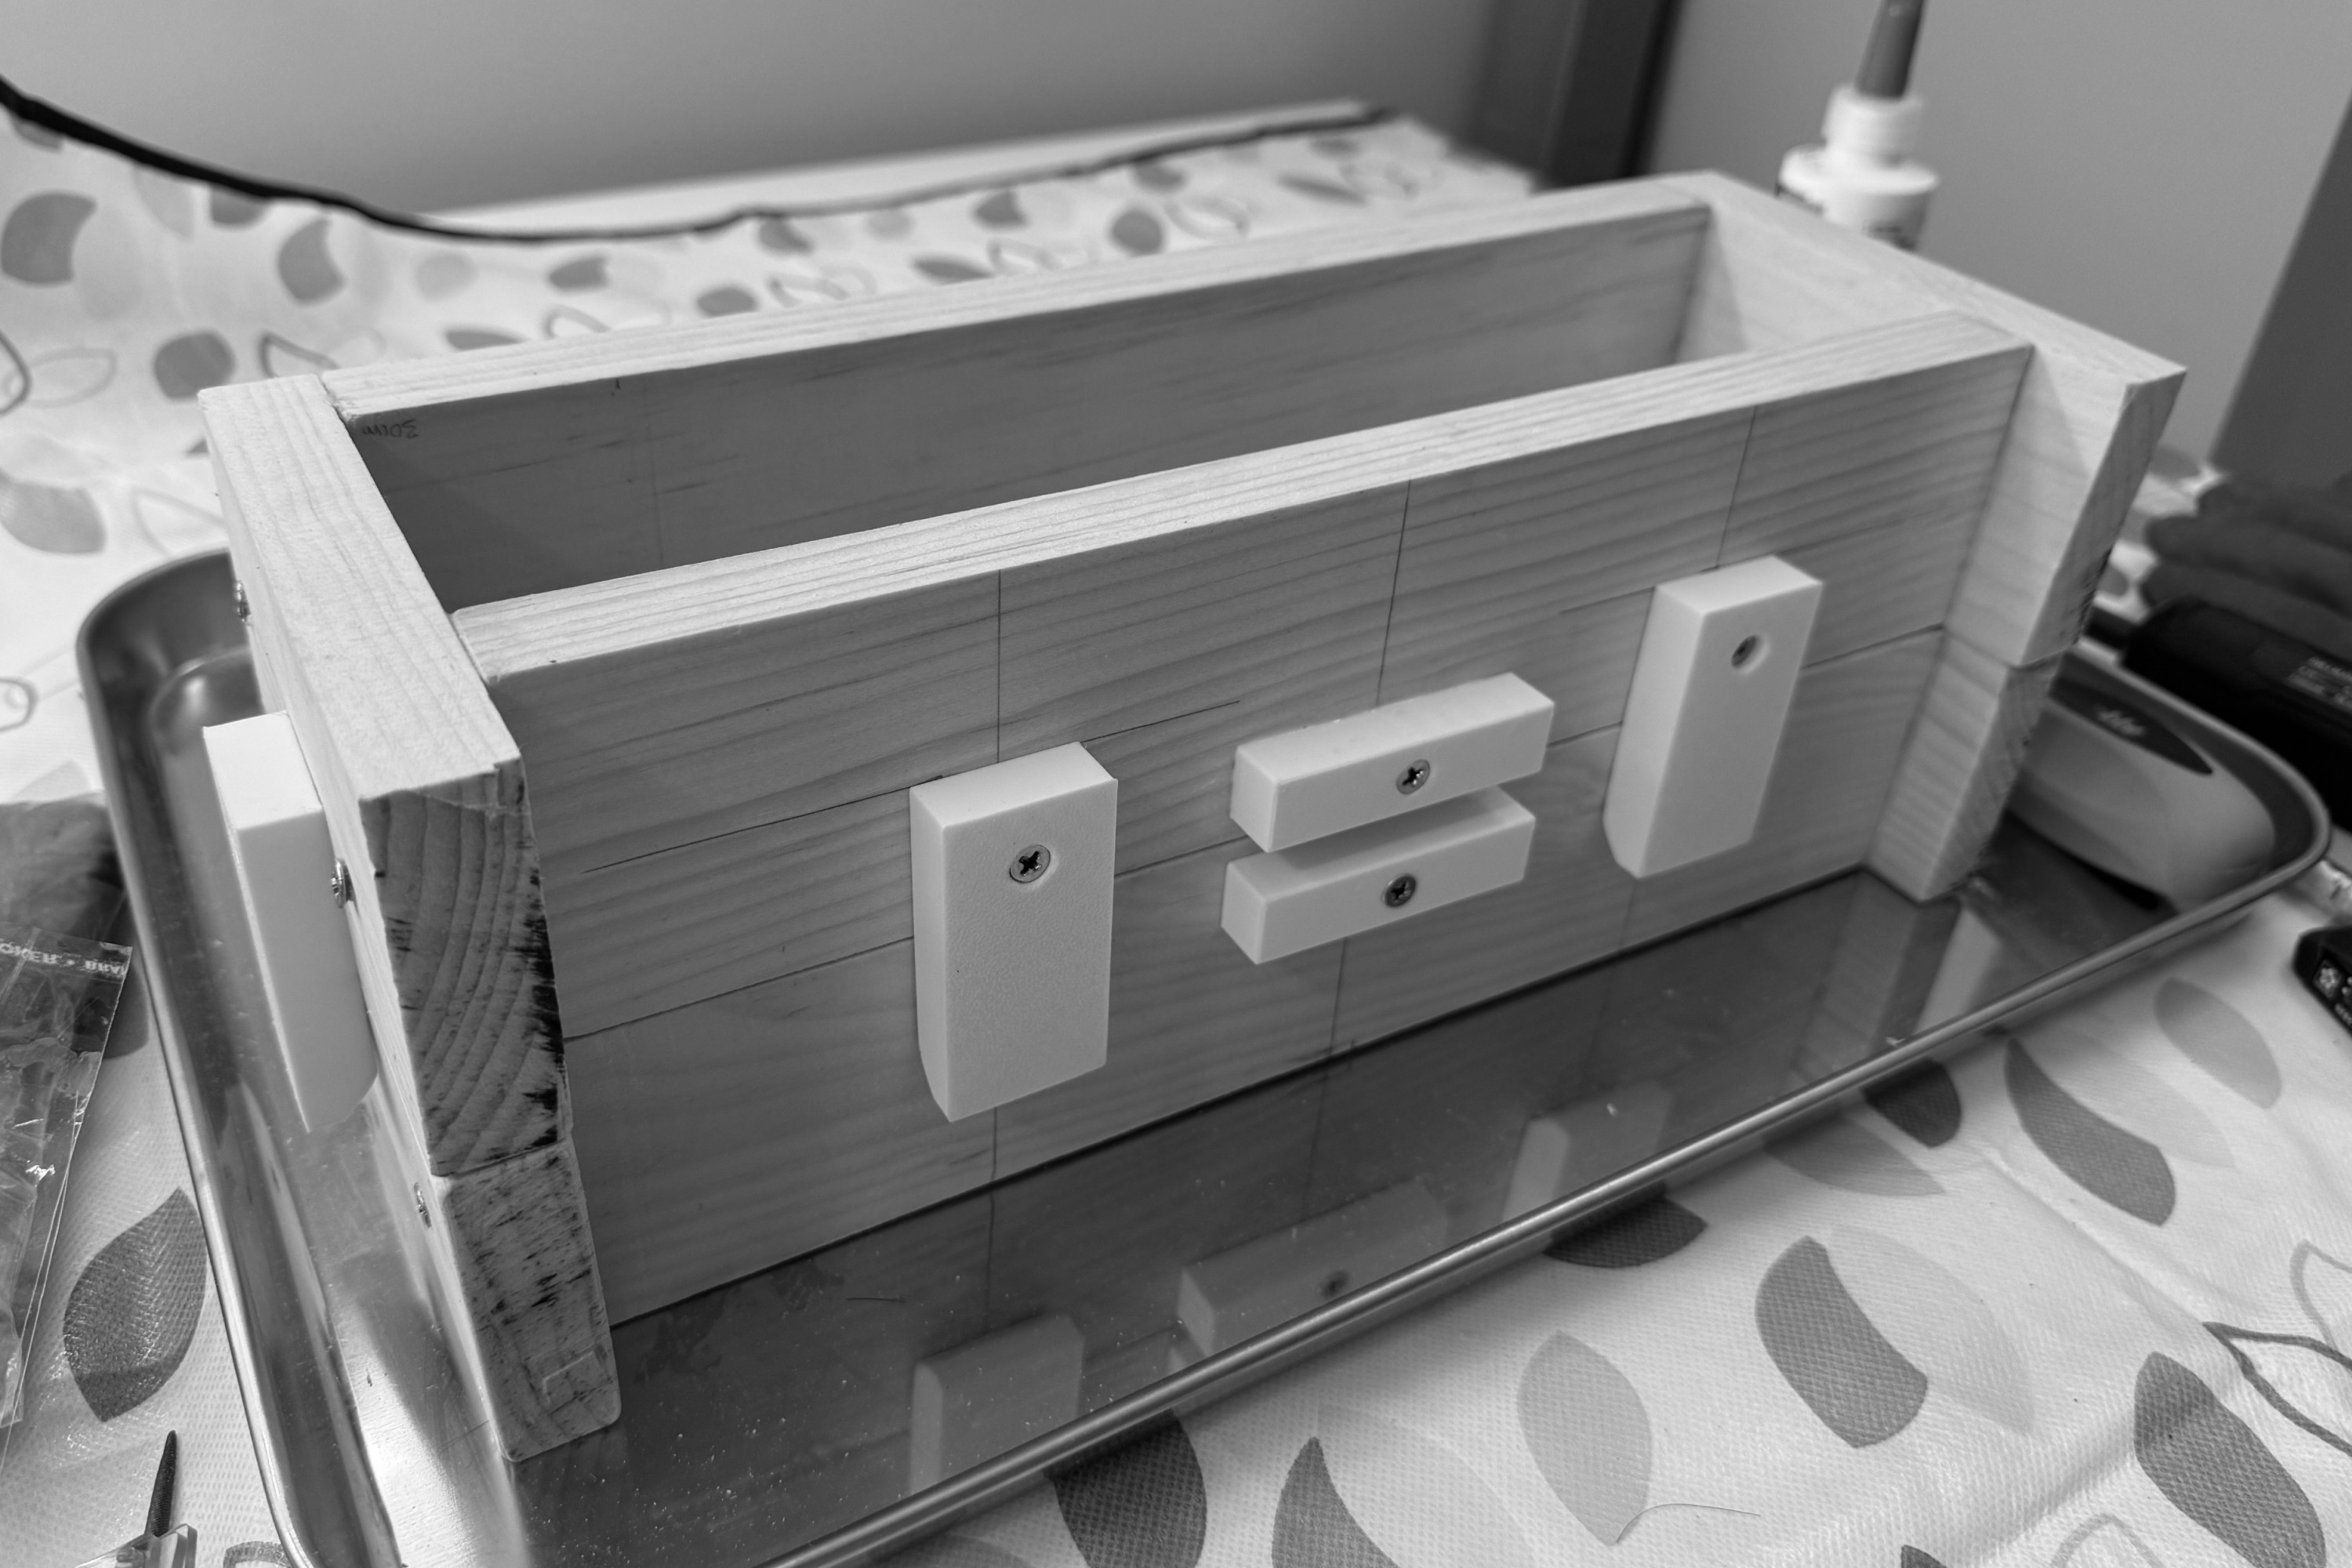
Given the volume of petrobond sand I had available, I quickly realized I would have to resize my box to be wayyyy smaller. So that’s why it looks kinda weird and one side is indented. Cutting the wood with a hand saw was the most annoying and painful thing ever. You can’t really cut fully straight if you’re not careful and I also didn’t have a vice… so it kept slipping and I had to use a bag of sand to weigh it down and keep it from moving. PLEASE buy a vice next time. After I cut the pieces, I used wood glue to stick everything together, because my screws were not really fitting- they would expand and cause the wood to split which was not good. I think I needed to drill guiding holes or something beforehand instead of going straight for the screw.
Learnings:
The size was still enough to maintain good distance between everything, so that was okay
Sanding down the middle section between the two halves of the flask let me make sure it was as close to flat as possible. To prevent it from rocking I also sanded the bottom.
After seeing a bunch of different ways to align the boxes, I found one that I could adopt. They had used wood to make these slabs that align all four sides. I hated the idea of having to cut more wood because it was such a pain and so much manual labor, so I made custom 3D printed side pieces with countersunk drill holes, and handles so I could easily mount them on to my box. In theory, the heat dissipation through the sides should not be enough to cause the PLA to flex or melt.
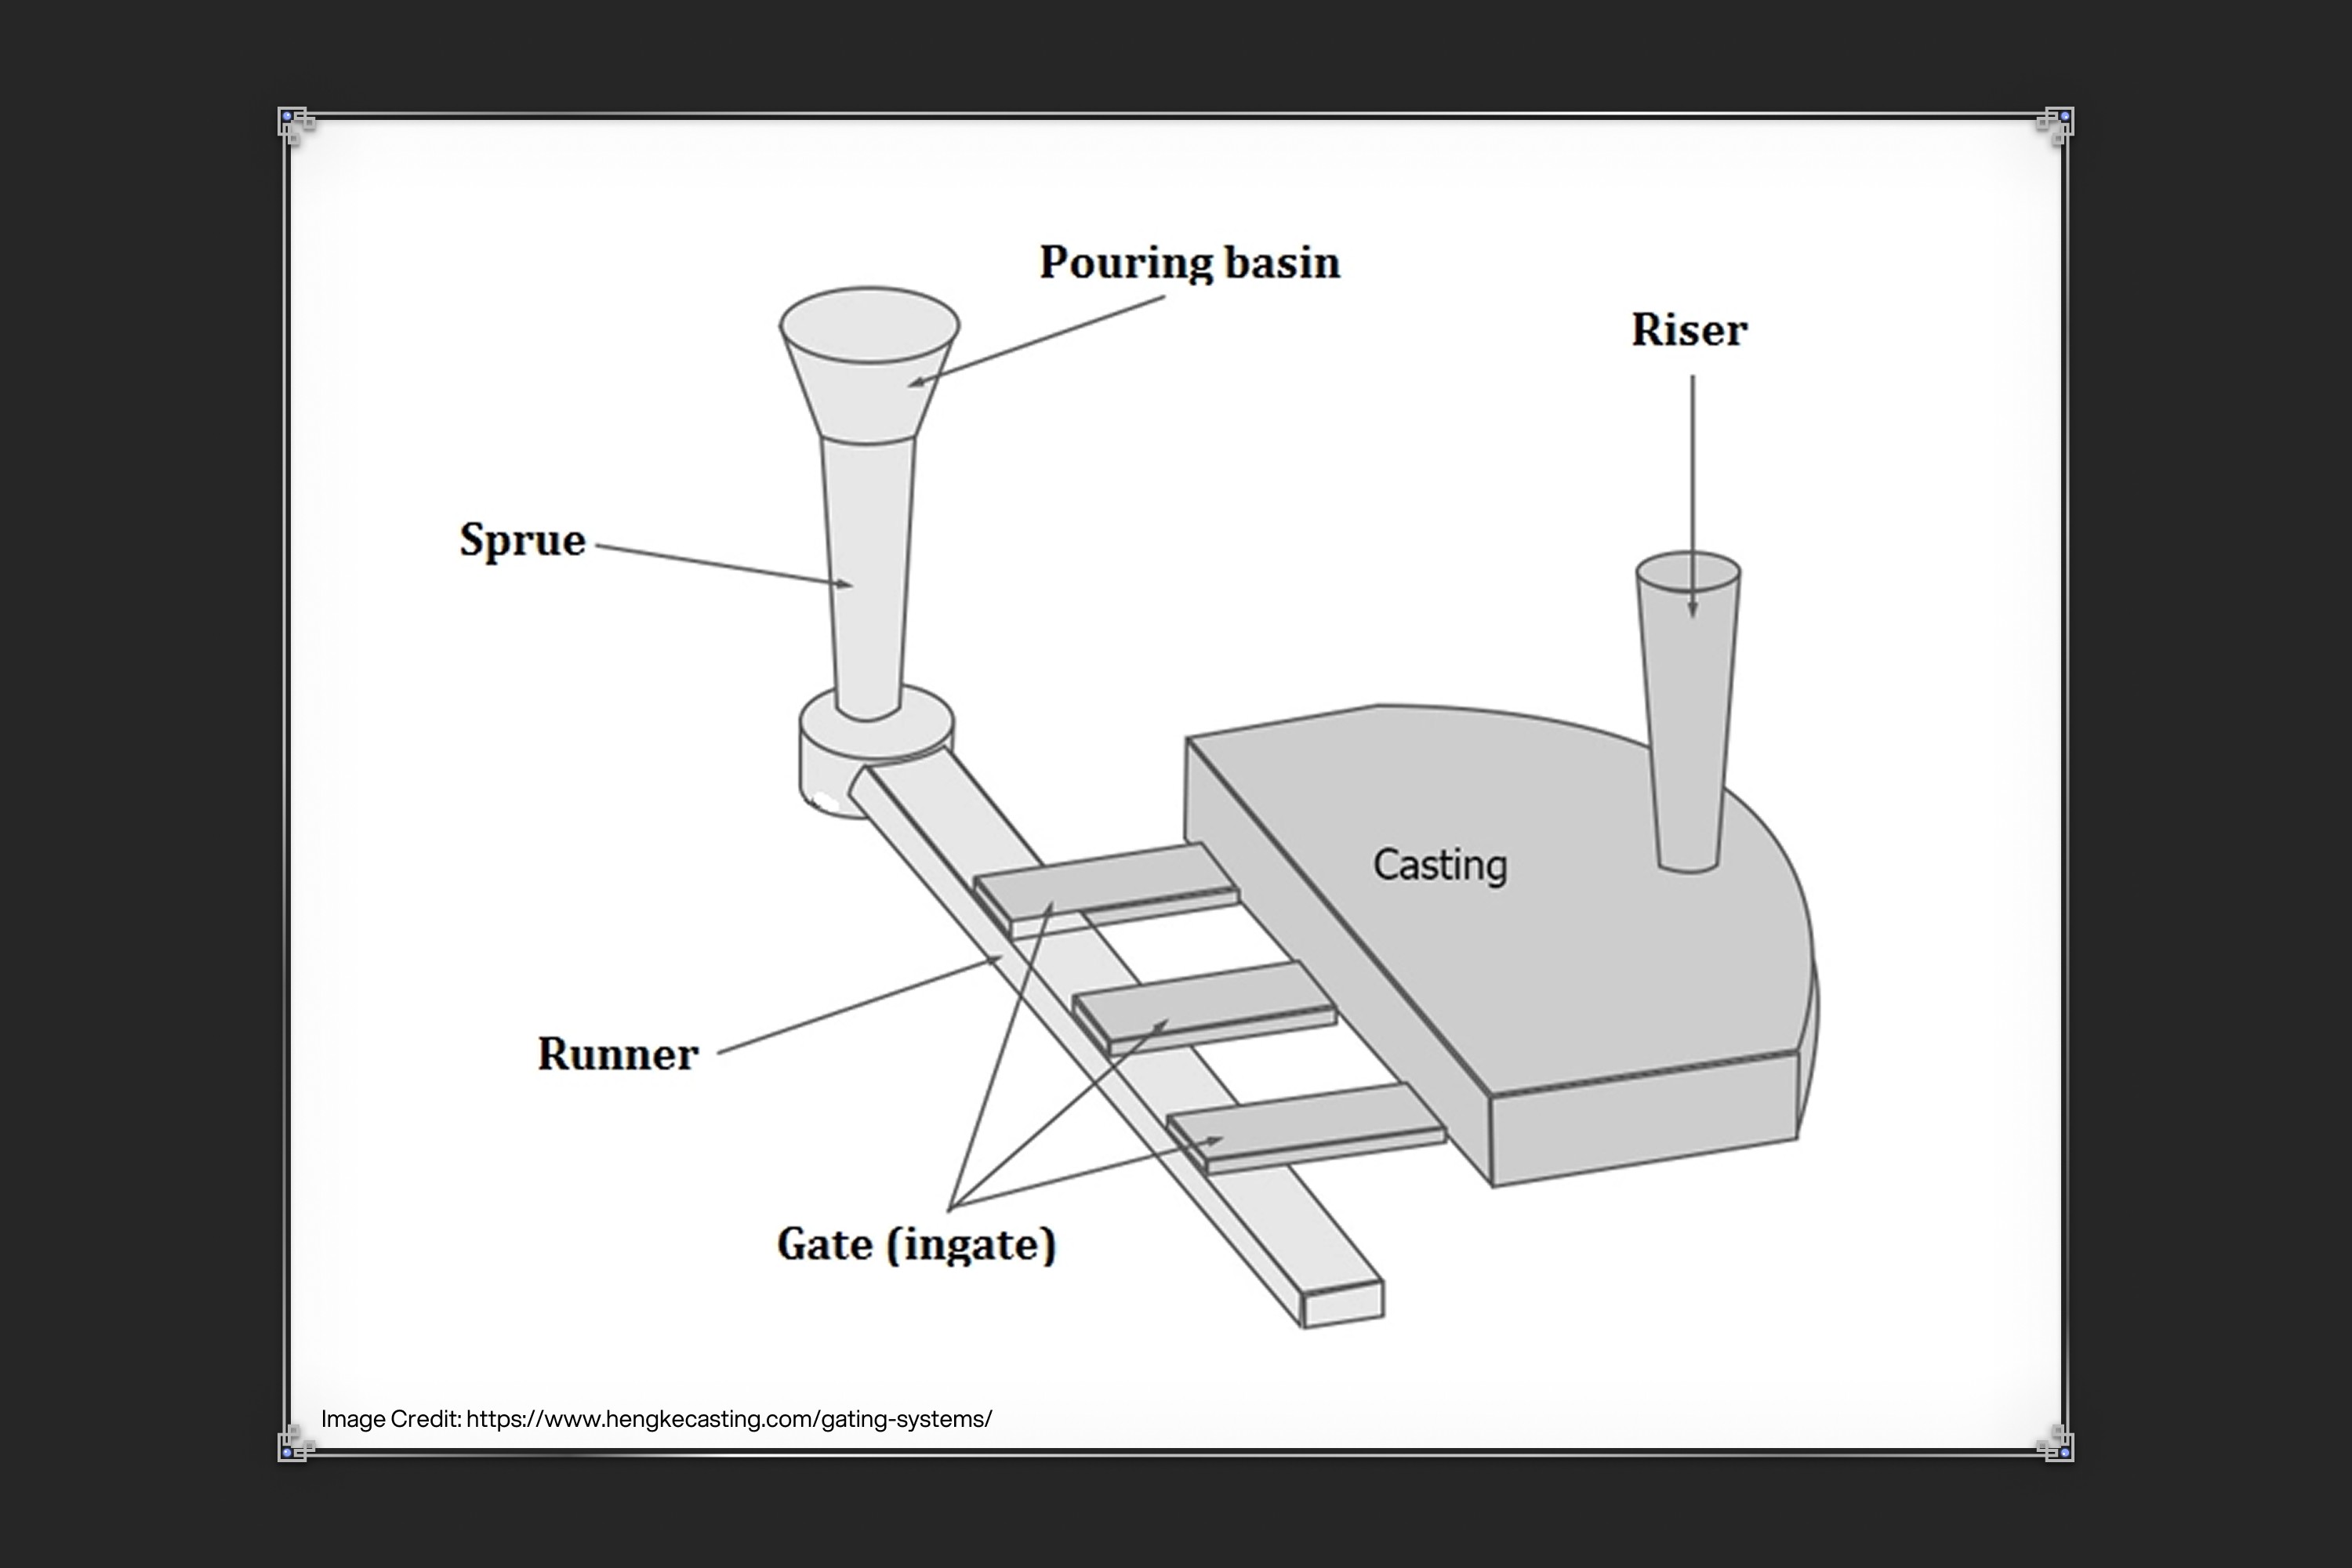
From all the sandcasting research I did, there’s things you need to do in order to get a good sand casting. One of these things was creating a basin for pouring, as well as a bridge, which then goes into a hole called a sprue, which then goes through runners into the casting. Overflow must go up and out through a riser to allow trapped air to move out of the casting area. These steps allow for molten metal to smoothly flow into the casting without any gaps and with minimal defects. I forget but there’s ways to reduce shrinkage too. Another method I should use next time is adding more air holes for smaller areas of the pattern so that metal can flow to it easier. The pouring basin is to reduce sloshing of the metal and so you get a smooth channel of liquid metal coming in with no slag and air bubbles. There’s also pouring techniques to reduce slag and oxidized pieces from slipping in.. there’s just so much that I had learned that I forget now.
Anyways, after the flask was built, it was time to fill it with sand! Here’s how it works- first, the bottom half of the pattern is placed at the top of the bottom flask, facing downwards. you then lightly dust the bottom of the flask using a makeup brush and parting powder. I used graphite powder for industrial furnace applications but I would probably use talc instead if I were to do it again, for the sole reason being it’s makes it hard to differentiate burnt sand and sand coated with graphite powder after the casting is done. The parting powder is used to prevent the pattern from sticking to the sand, making it easier to remove without disrupting the sand. A note on safety- make sure you wear a respirator for this, it is very fine and bad for your lungs.
Next, I used a 300 mesh sift to start sifting small pieces of petrobond on top. This is so that you can ensure there’s no big gaps close to the pattern and you get the most detail possible. To pack the sand, I 3D printed a custom sized sand rammer to fit my flask as well as some other tools to help me make the sprue and the riser.
Credit: Sand rammer 3D model by @Paul'sGarage
from the video: Casting Aluminum Sand Rammer from a 3D Printed Pattern with a Vertical Casting Flask
Next up was flipping it over, fitting the second half of the pattern on top, and then putting another layer of parting powder on top. The top of the flask (called the cope) is then placed on the bottom (called the drag)
so now I could place the sprue and riser, then fill the rest with sand and pack it down. This was kinda scuffed cause half way I was gonna run out and had to place an extra slab of wood under one side … thankfully this was okay and didn’t mess too much up, just that things weren’t packed as evenly as I wanted. Now that everything was filled, I took out the sprue and riser pieces and cut out a small path for the gate- the connection between the pattern and the sprue (entry point of the metal).
Now everything was ready- I took the pattern out and then started heating the zamak ingot. Took round 30 mins, and please remember to wear proper safety gear- full face shield, boots, steel plate under with firebrick, graphite mold for excess, leather gloves, respirator- even if zinc fumes should not occur for temperatures that are below I think 700 degrees C . It’s still very hot and can be bad if things spill out.
Lesson learned here- the basin maximum diameter needs to be smaller than the crucible diameter because I won’t be able to re melt it down if it’s too big lol. I poured an ingot’s worth of zamak in ~1lb and it successfully filled the whole mold. However, it didn’t come out the riser, maybe because I didn’t add enough? I’m not sure why that is, and if that was one of the reasons for shrinkage.
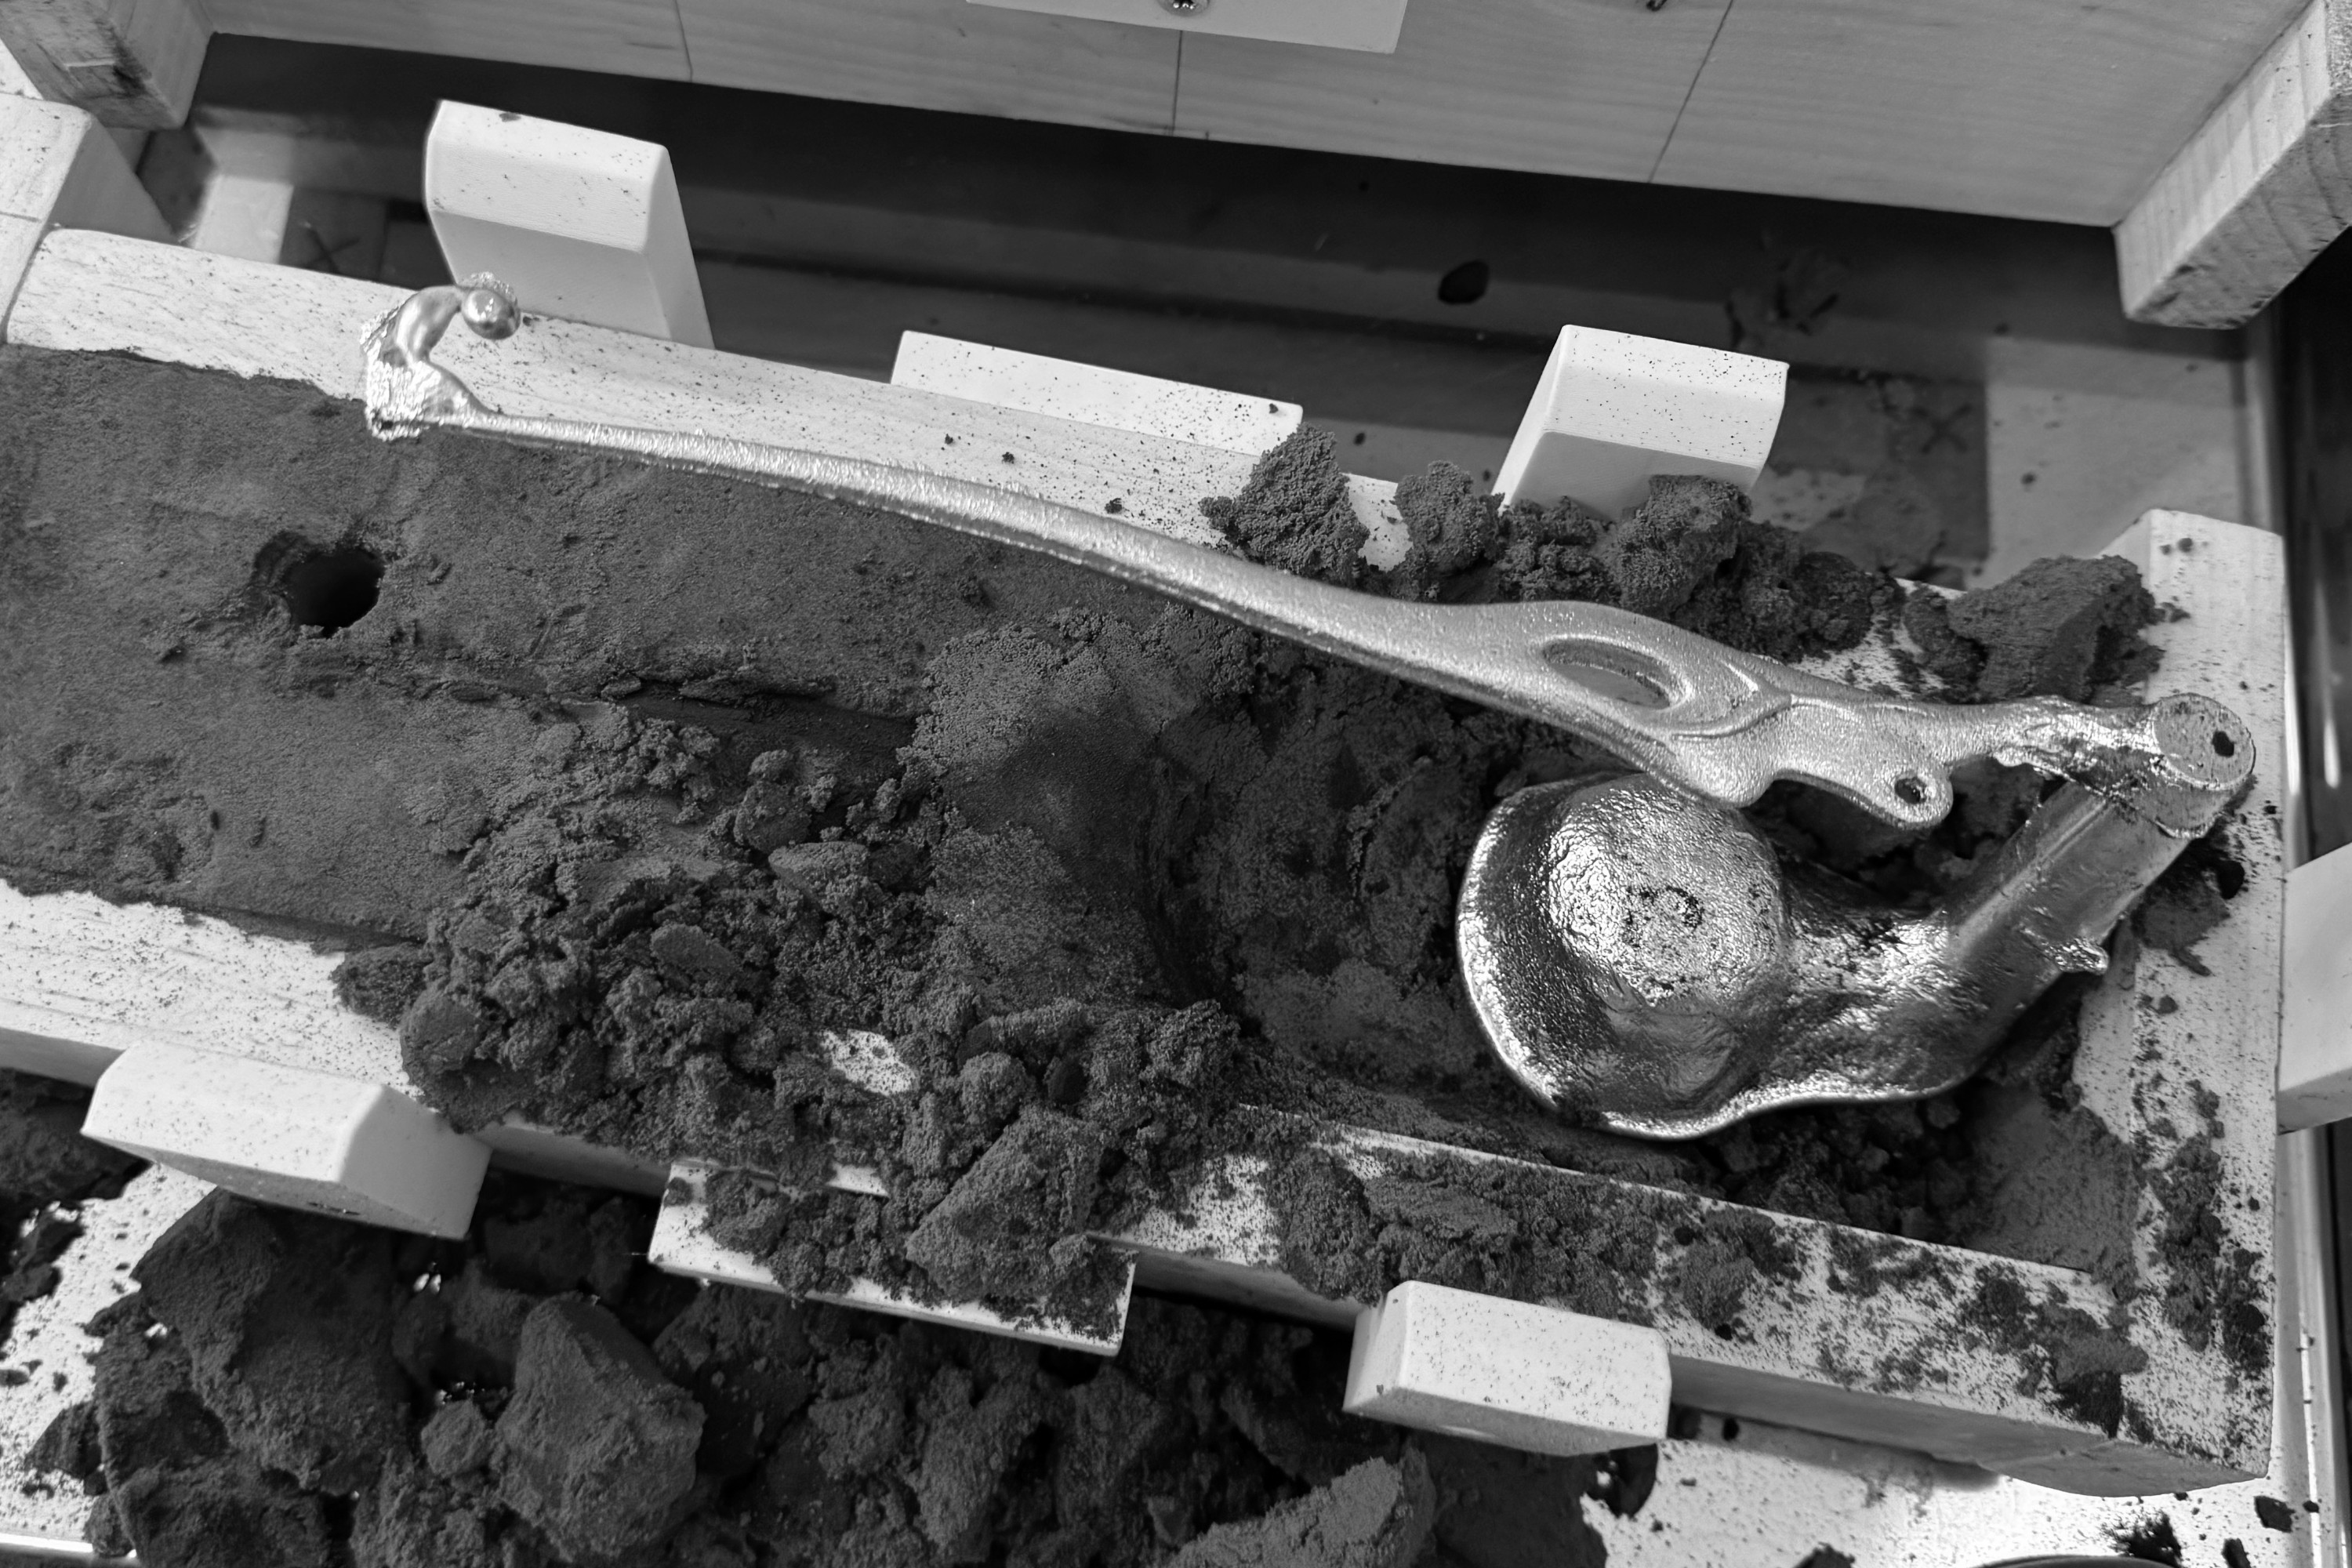
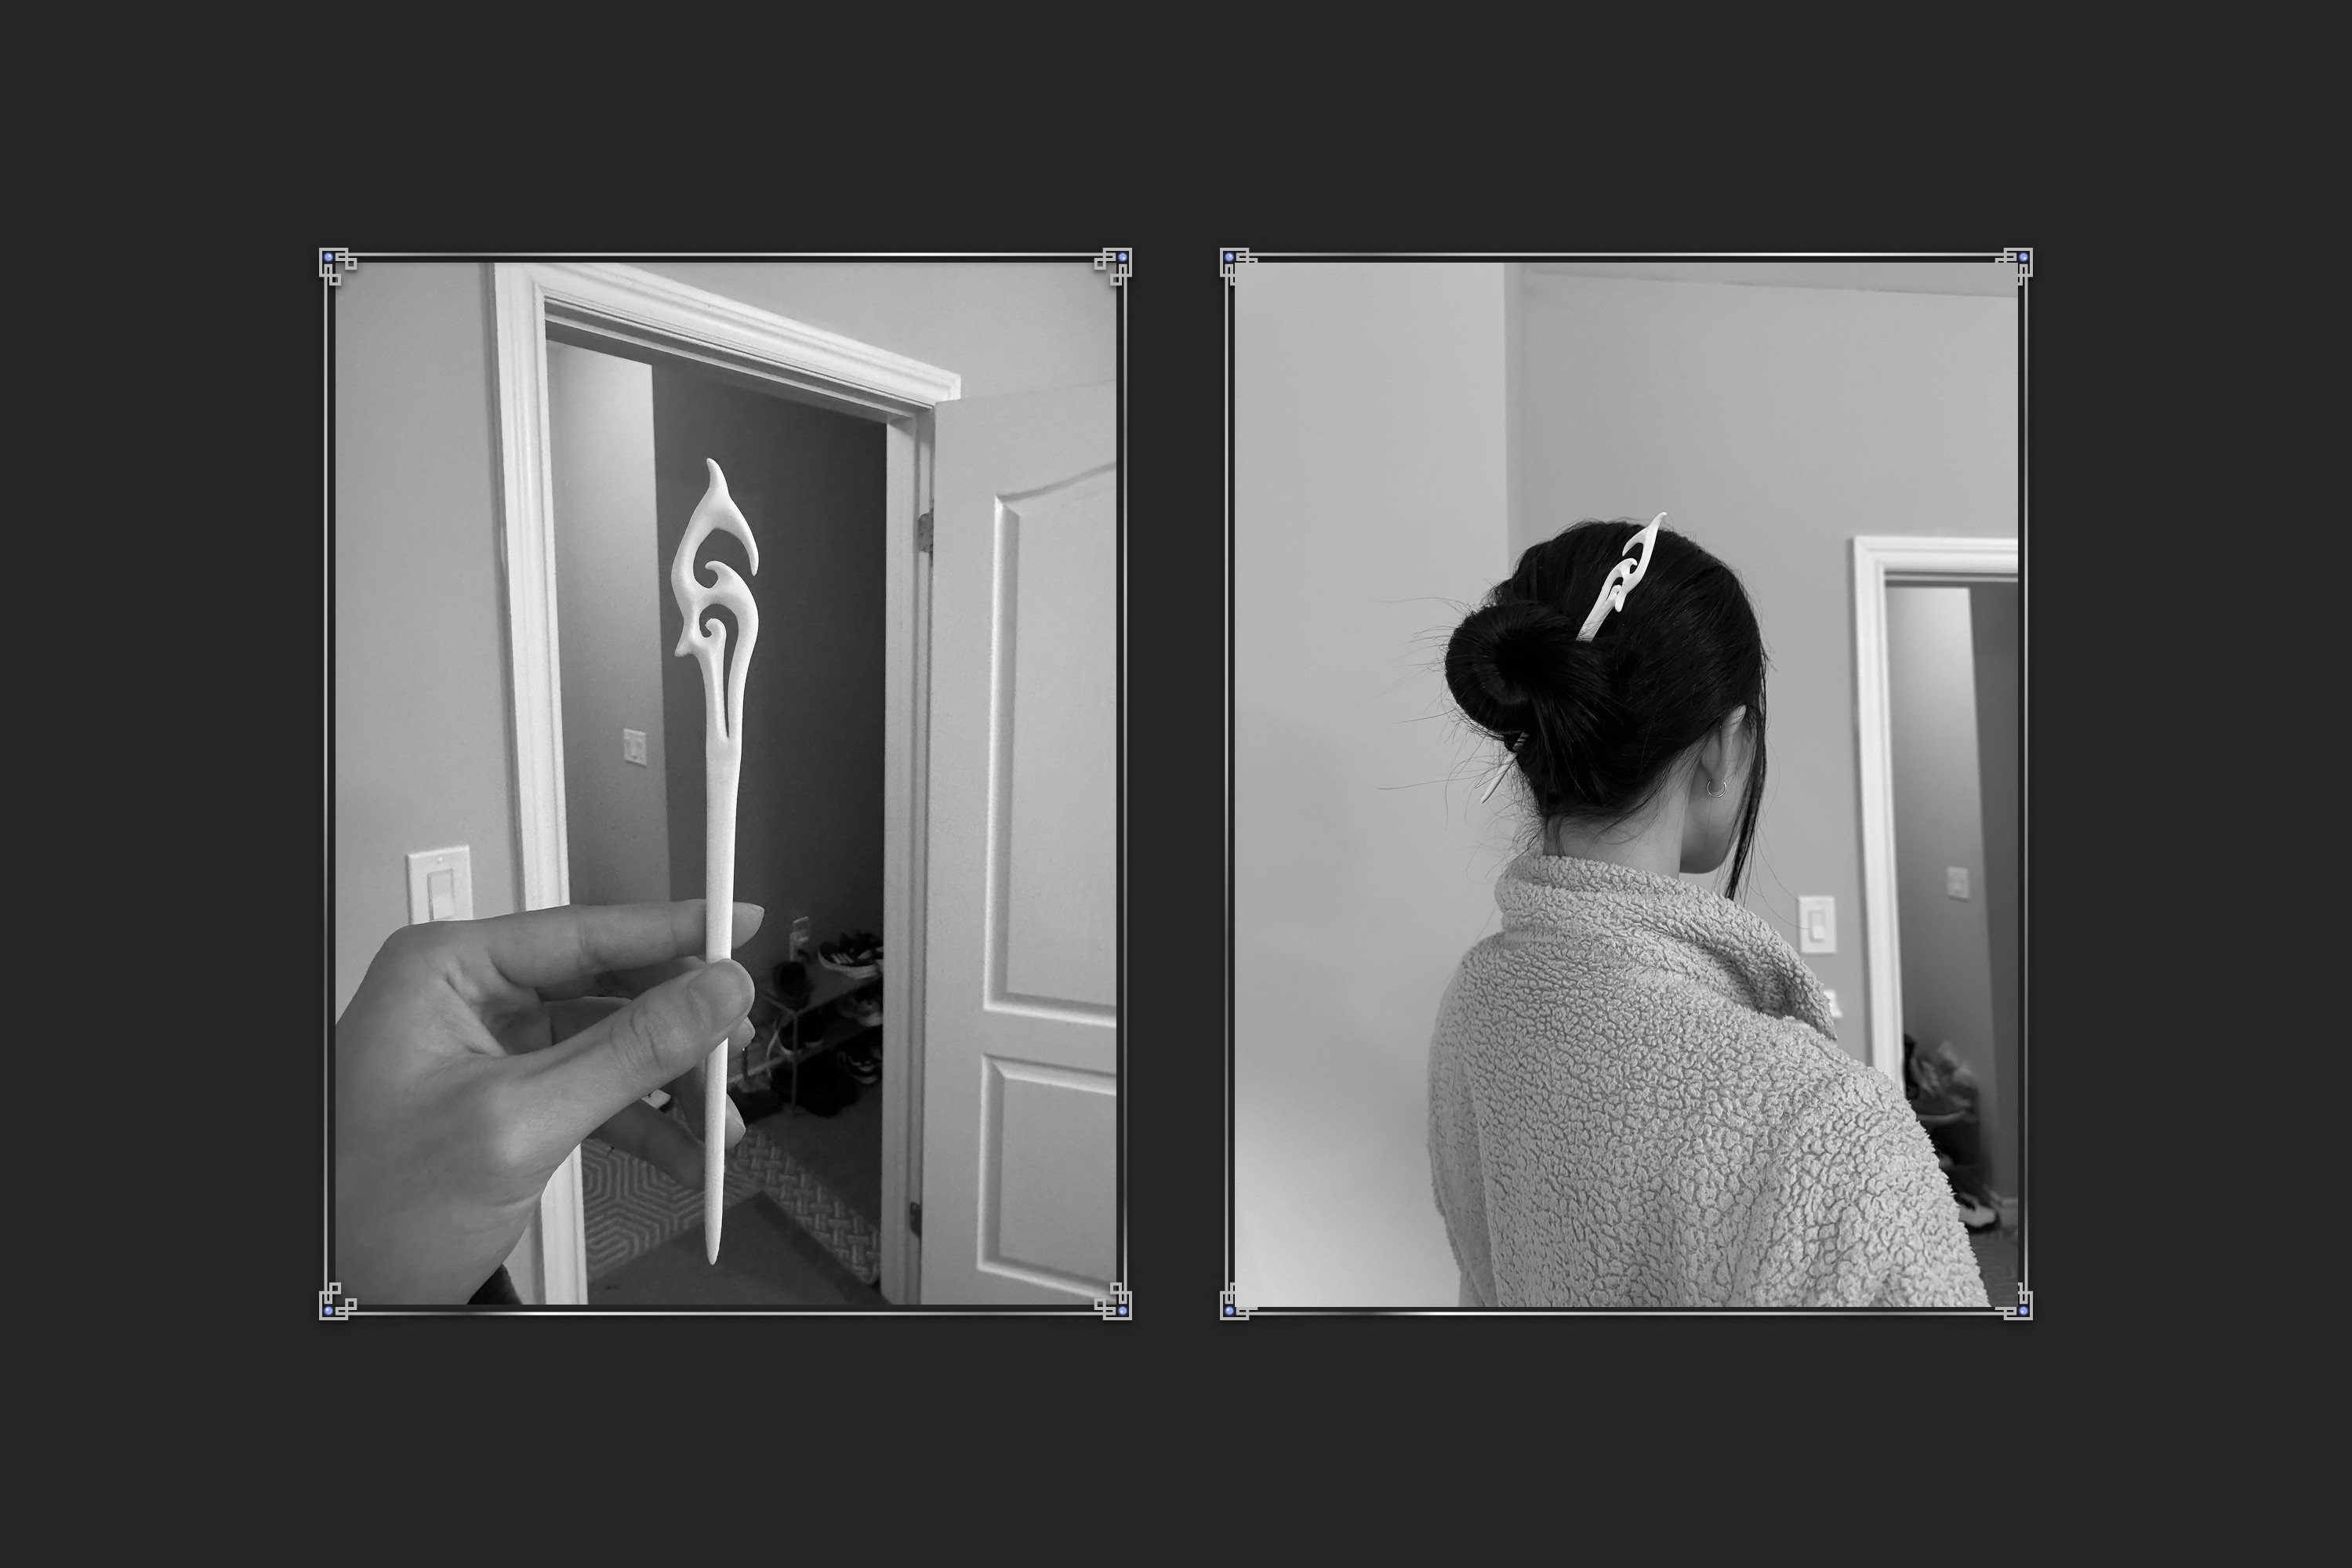
It was finally time for finishing touches! I cut through excess pieces connecting the sprue to the pattern using a rotary tool, removed excess flashing from the sides using a sanding bit, and then wet sanded the surfaces by hand using increasing grit because the sanding bit was too harsh. Once it was pretty nice and smooth, I used polishing compound with the rotary tool to get a nice finish. once that was done.. I used some basic gorilla glue to stick on the flower, and also attached the bead via a chain I bought at Michaels. I tested a few different color palettes, but I really liked the elegance and class you get with the silver, white, and light blue combo. It has the sort of subtle, yet refined beauty that isn't trying to be flashy, or over the top. Something you could wear without standing out too much.
However, after polishing, I realized my mistake. Zamak 12 was the cheaper option compared to silver, but I paid the price once I saw the oxidized look of it, and so I opted for the easiest solution which is to apply a coating of clear nail polish on it, but I did not coat it well enough.. which caused a lot of bumps and bad looking surface imperfections. Next time I would try Renaissance wax, or something more durable. I think Zamak 12 could still be a good option, but planning ahead for taking care of it after polishing is important.
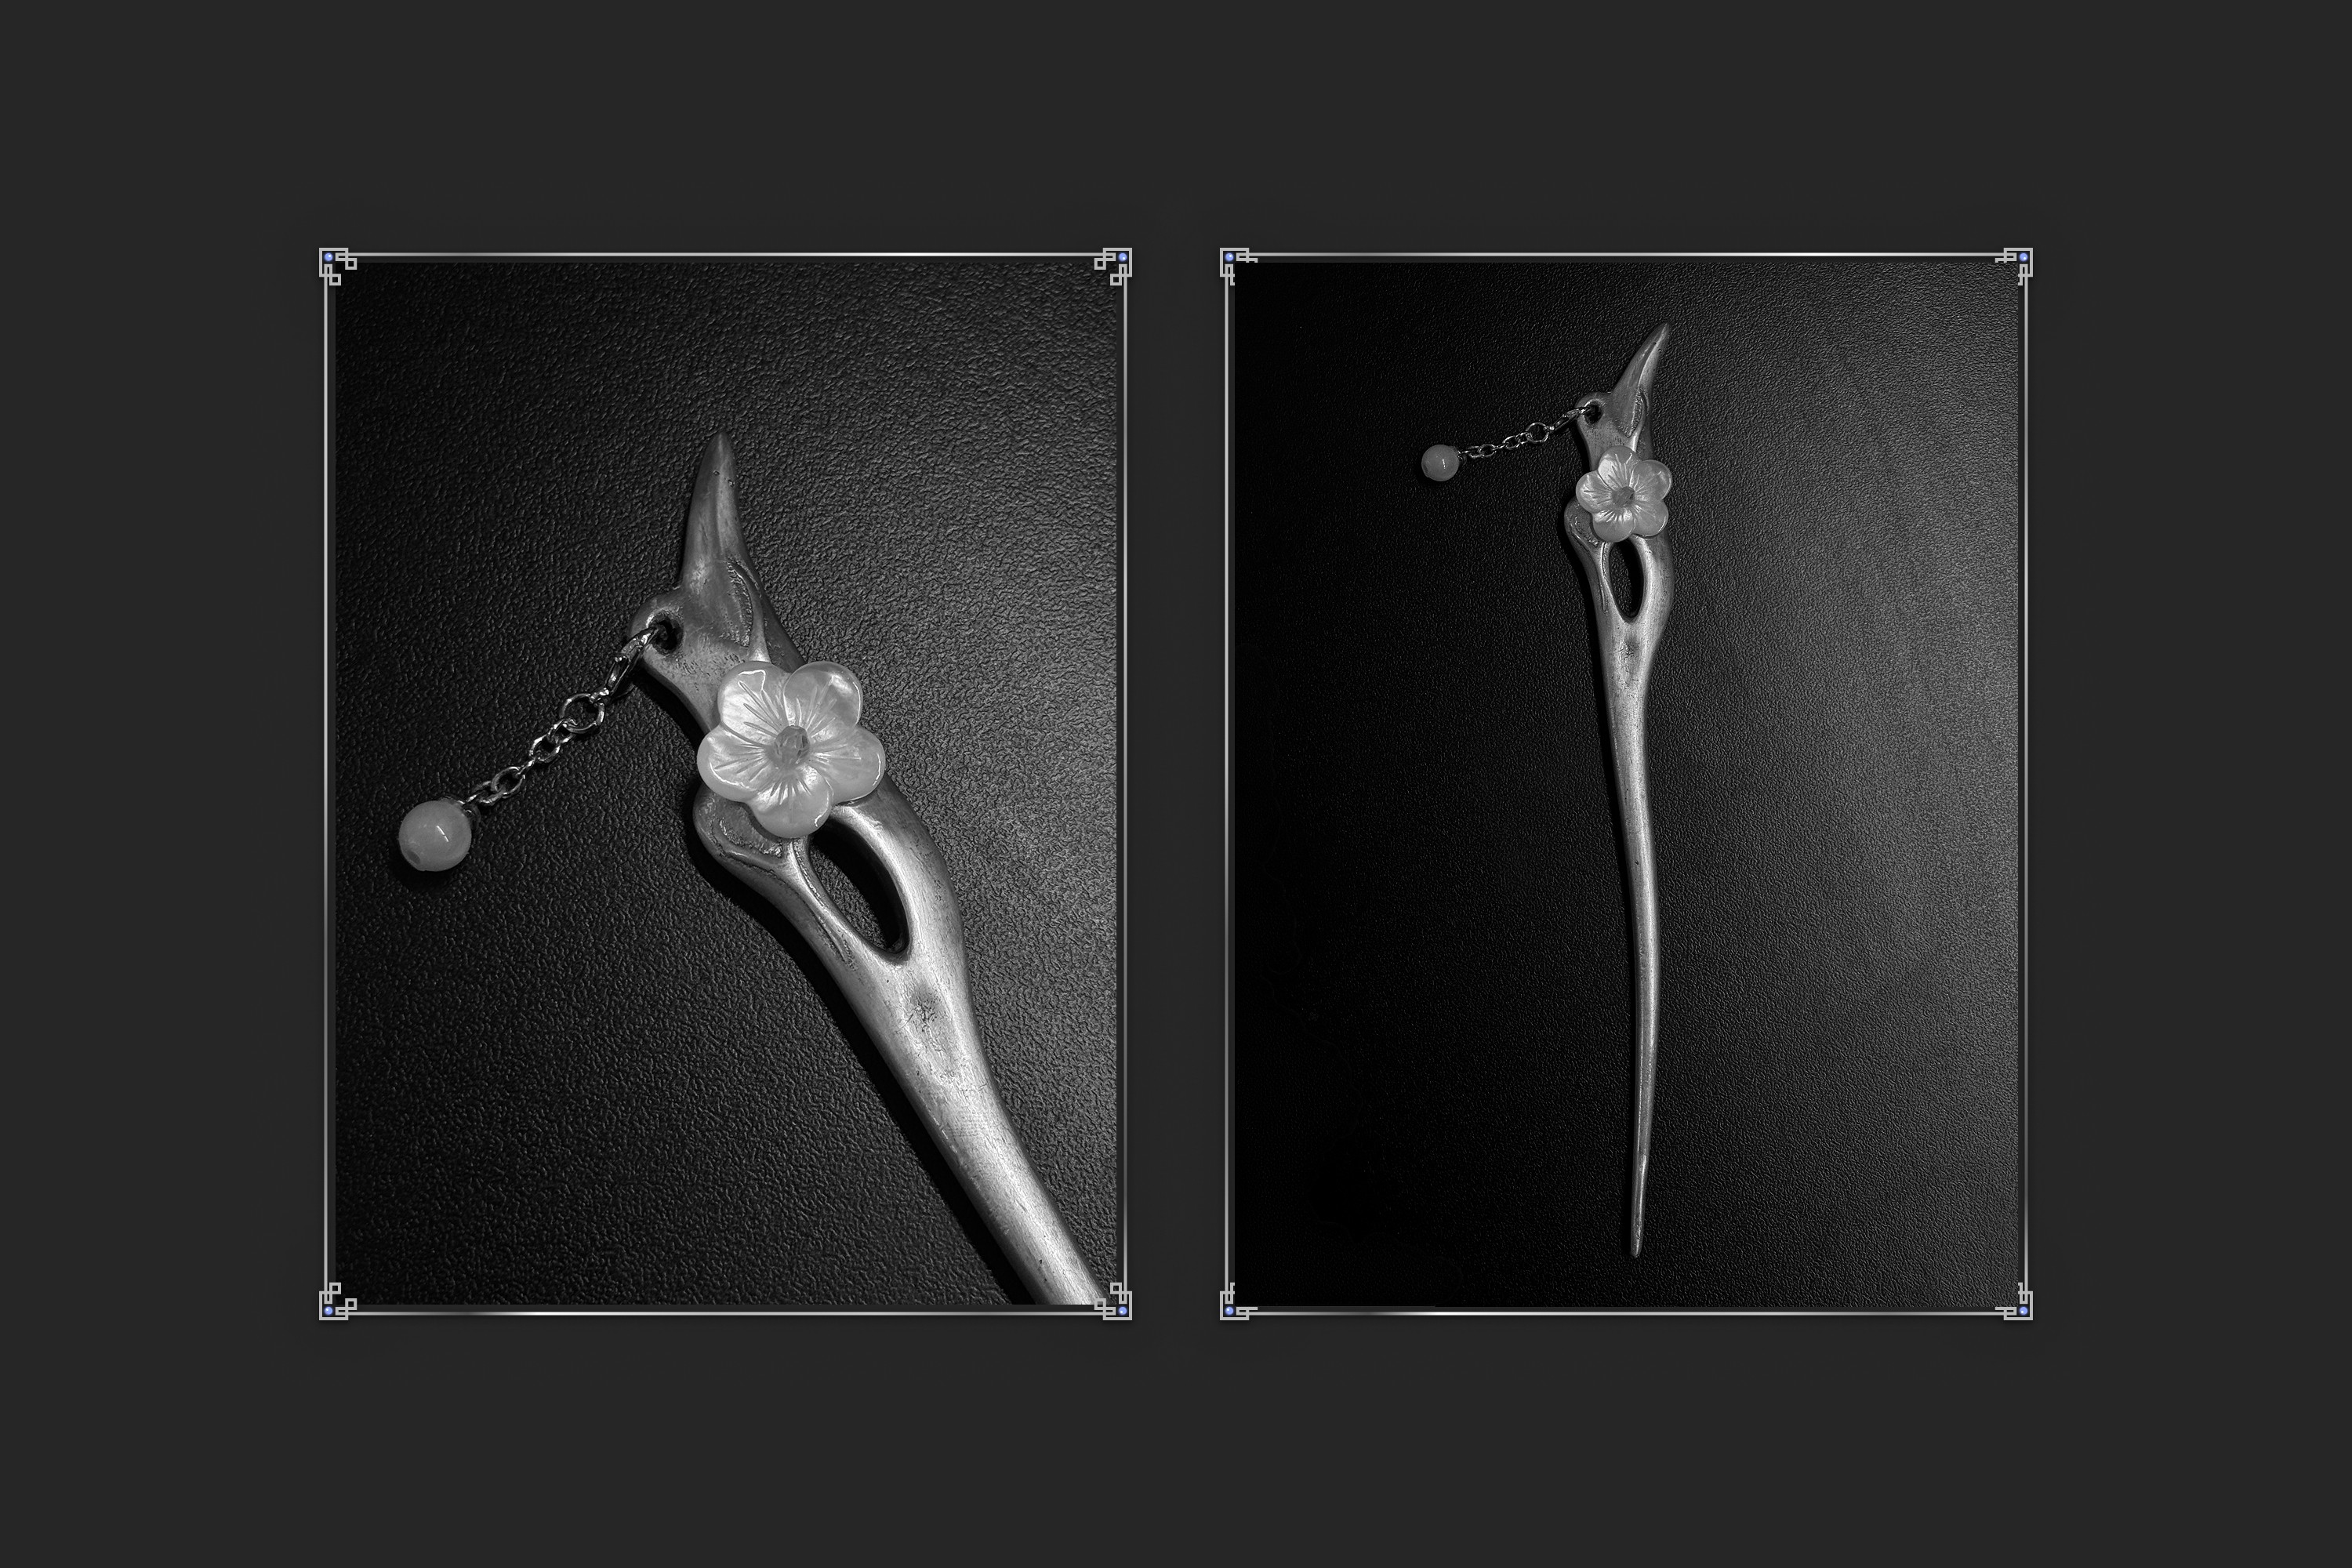
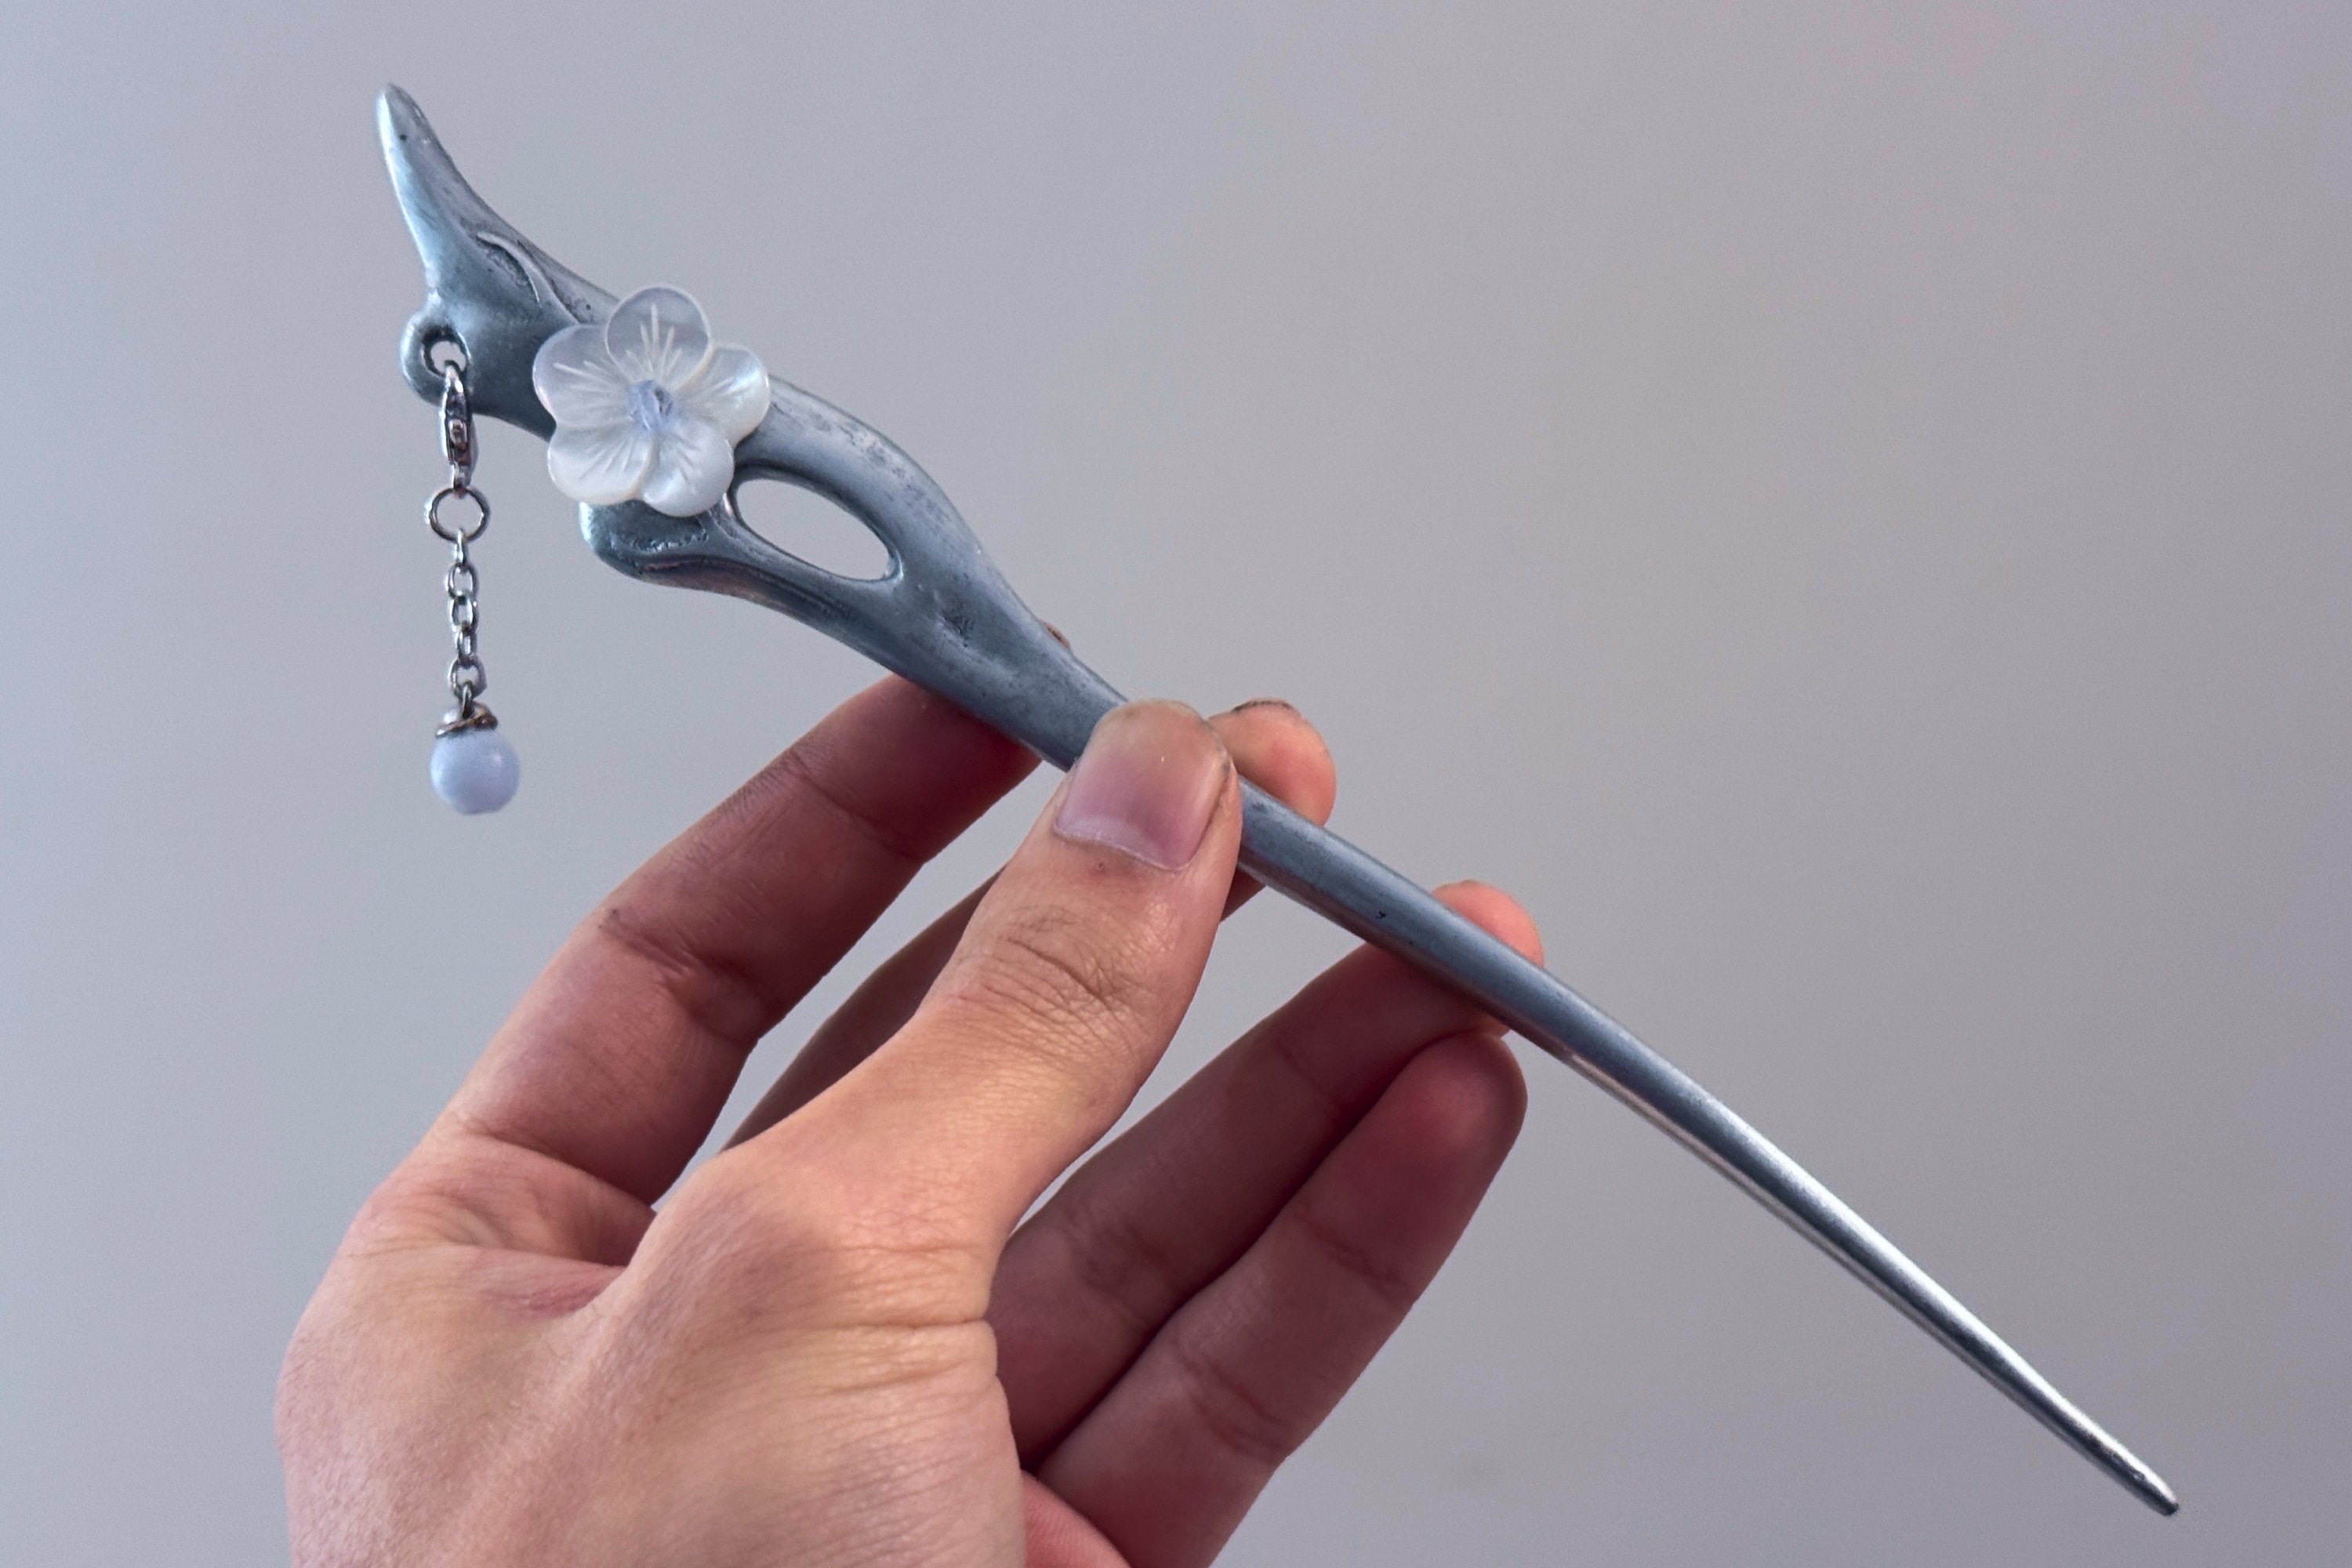
Final result!! I'd say not bad for my first time sandcasting. Seeing it in photos does not compare to how it feels- especially with the weight of it in my hand and seeing it in person.


